• About
  • Food Photography
  • Portraiture
  • Contact
Menu

Caroline Zhang Photography

  • About
  • Food Photography
  • Portraiture
  • Contact
×

Chelsea Buns

Caroline Zhang December 10, 2012

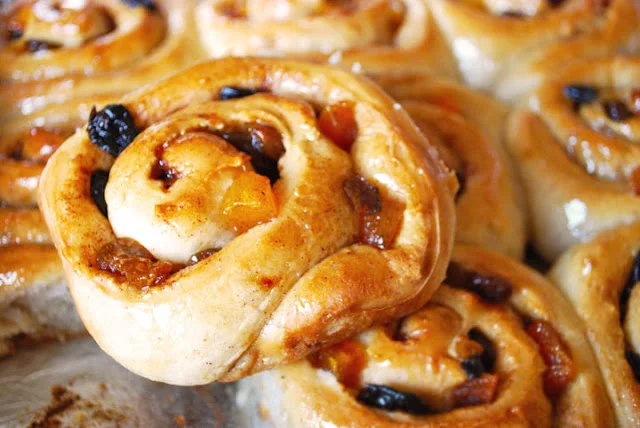
Happy December 10! Aka happy less than two weeks till finals! Freedom is SO close. But don't worry! We're talking about something much happier today. Chelsea Buns. Beautiful, swoon-inducing, Chesea Buns. If you haven't heard of them before, they're a British tea treat that is so much more wonderful than cinnamon rolls. They're stuffed with dried fruit, and instead of an icing, they are covered with a sticky syrup. Make them today!

I based the sweat bread portion of the recipe on the Pioneer Woman's Cinnamon Rolls. Here's how you make it:

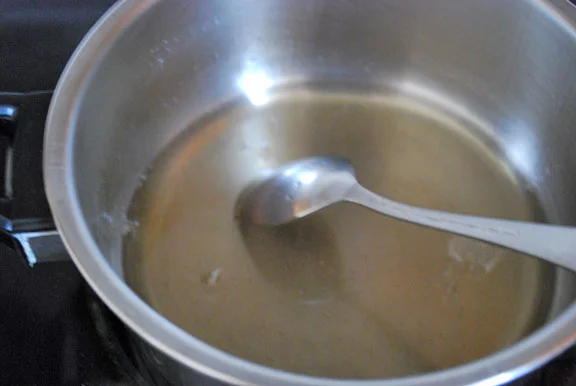
Pour the milk, vegetable oil, sugar, and cinnamon into a pot and stir. Heat it up until it is just below boiling. Take it off the stove and let it cool until it's only warm. Sprinkle the yeast over the liquid and let it sit for a minute.

Add flour. Just dump it into the pot.

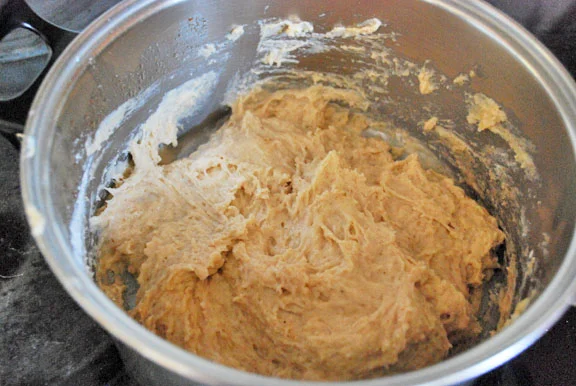
 Mix it all together. It'll be super wet and sticky. Cover and let it sit for 1 hour in a warm place.

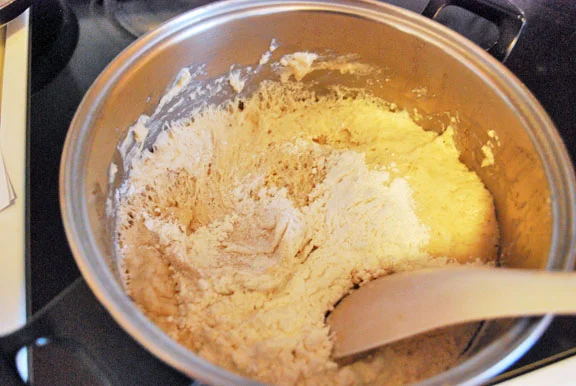
 Stir in the remaining flour, and the salt, baking powder, and baking soda.

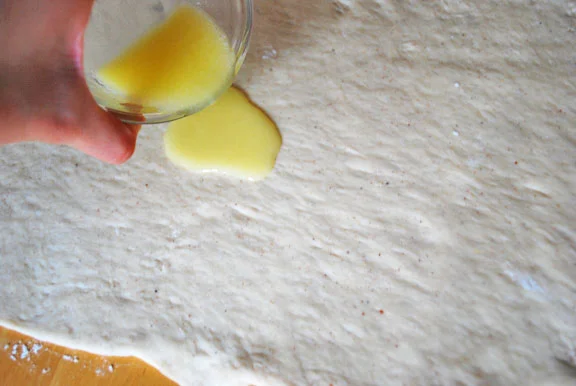
 Roll the dough out into roughly a 10 in. x 15 in. rectangle. Spread melted butter on it.

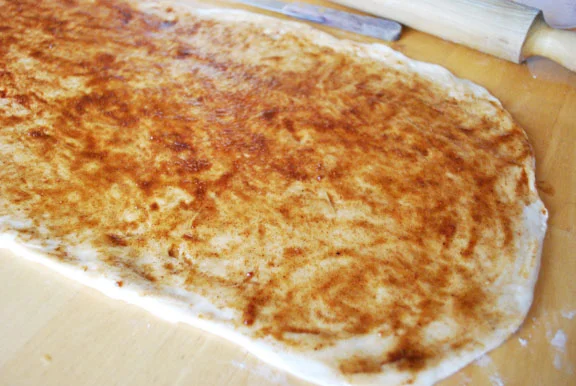
 Mix together the brown sugar and cinnamon. Spread that onto the dough too. Use your fingers; it's fastest.

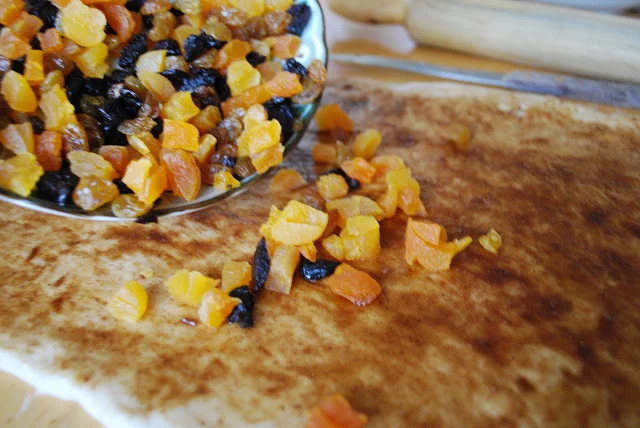
 Chop up some dried fruit -- apricots, raisins, dried cherries--whatever you have on hand. Pour that onto the dough and spread it evenly as best you can.

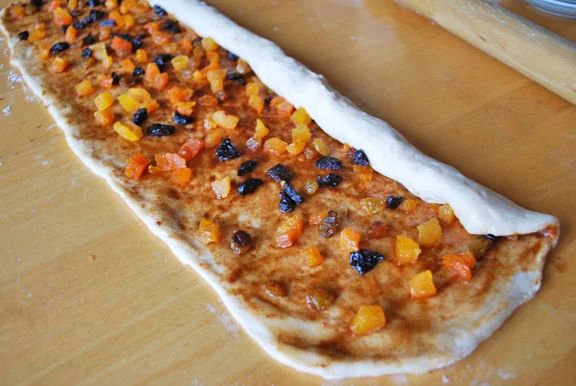
 Start rolling up the dough....

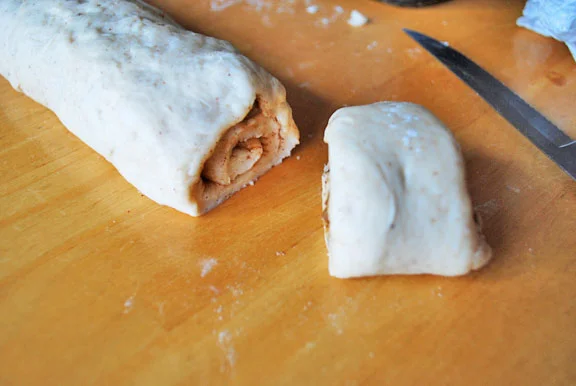
 ...until you get a log. Then cut the log into about 12 segments.

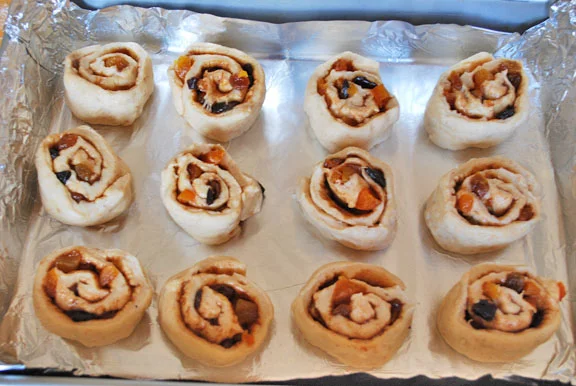
Stick them in a greased baking pan, cover them, and let them rise for about an hour in a warm place until they are doubled in size. I forgot to take a picture of them after rising, but they basically rise until they fill the whole pan.

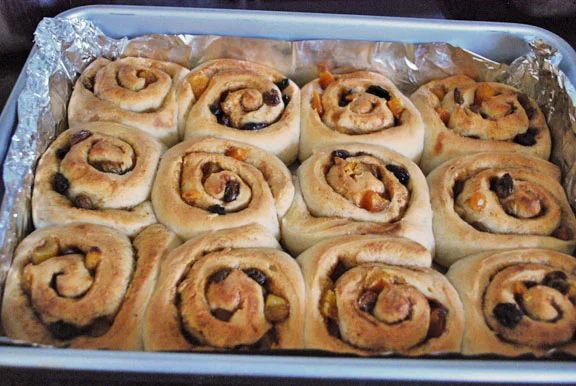
 Bake them. I let them get a little too brown. You want them to be only a little golden-brown.

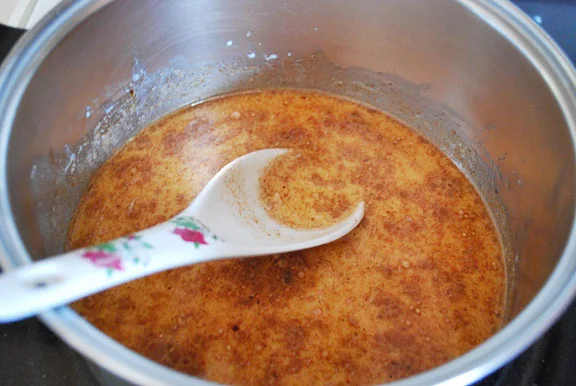
 While the Chelsea Buns are baking, make the syrup to brush on top of them. Mix together the honey, sugar, and water, heat it on the stove until boiling. Take it off the heat and let it cool.

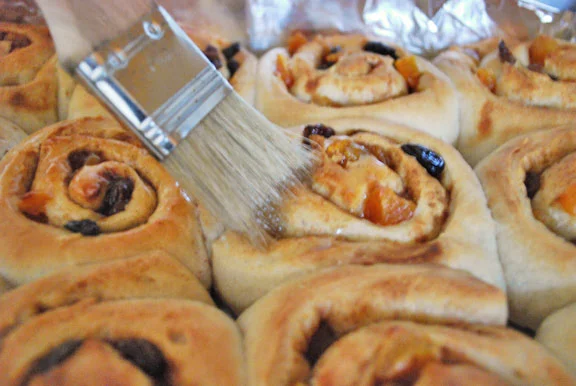
 Brush the syrup over the buns, dig in, and EAT!

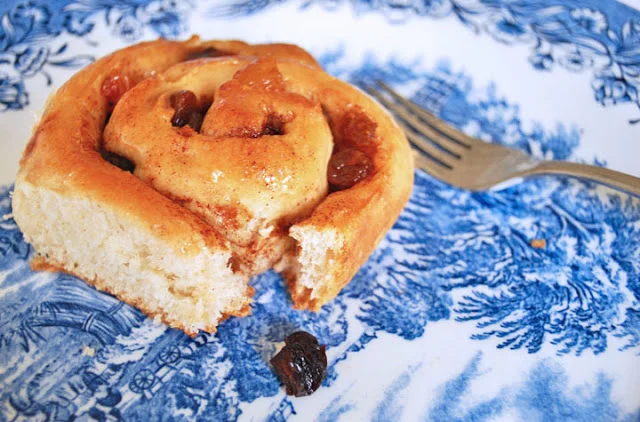
 ...Or if you're feeling ambitious, you could actually serve them on china with tea. But only if you have enormous amounts of self-control.

Love always,

Caroline

Printable recipe of Chelsea Buns

.

Chelsea Buns

British tea treats stuffed with dried fruit and drizzled with honey syrup

.

Dough portion based on a recipe from The Pioneer Woman

Yields: 12 sweet rolls

Ingredients

For the dough:

1 cup milk

¼ cup vegetable oil

¼ cup granulated sugar

1 teaspoon cinnamon

1 ¼ teaspoon yeast

2 ¼ cup all-purpose flour

¼ teaspoon baking powder

¼ teaspoon baking soda

1 teaspoon salt

For the filling:

1 tablespoon melted butter

3 tablespoons brown sugar

2 teaspoons cinnamon

1 ½ cups chopped dried fruit (apricots, raisins, currant, etc.)

For the syrup:

3 tablespoons granulated sugar

2 tablespoons honey

¼ cup water

Directions

  1. Mix together the milk, sugar, cinnamon, and vegetable oil in a pot and heat it until the mixture is just below boiling. Take of the heat and let cool until the liquid is only warm.
  2. Sprinkle the yeast over the liquid and let it sit for a minute.
  3. Stir in 2 cups of flour. The mixture will be very sticky and wet. Let rise in a warm place for 1 hour.
  4. Stir in the remaining ¼ cup flour, the baking powder, baking soda, and salt. If the dough is still too wet to work with, add in a little more flour.
  5. Turn the dough out onto a floured surface and roll it into a 10 inch x 15 inch rectangle.
  6. Spread the melted butter onto it.
  7. Mix together the brown sugar and cinnamon and spread it over the dough.
  8. Sprinkle the dried fruit over the dough.
  9. Roll the dough into a log.
  10. Cut the dough into about ¾ - 1 inch segments. You’ll end up with about 12 circles
  11. Place them into a greased baking pan, cover, and let them rise in a warm place until doubled in size.
  12. Preheat the oven to 375 degrees Fahrenheit.
  13. Bake them for 12 - 15 minutes, until golden brown.
  14. Meanwhile, make the syrup. Mix together the honey, sugar, and water, heat it on the stove until boiling. Take it off the heat and let it cool.
  15. Once the buns are done baking, brush the syrup over them.
  16. Serve them warm, and enjoy!
In "bread", "breakfast", "fruit", "sweet roll", "tea"

Blue Velvet Cheesecake

Monica Cheng December 1, 2012

Lo and behold, this legendary cheesecake might possibly be the most delicious thing you will have ever put in your mouth. One bite. You're in heaven, your worries are gone, and life is good. And then you have some more.

Seriously, these are freaking delicious. It's a melt-in-your-mouth experience that easily matches the quality of those amazing cheesecakes from The Cheesecake Factory.

We ran out of red food coloring, so we took inventive measures and brandished the mighty and exotic blue food coloring! I suppose these photos aren't my best, and the cheesecake could've used a little polishing to look more photogenic, but

the taste

...Oh, the taste made up for everything.

And besides, didn’t anyone ever tell you that looks aren’t everything? Let's get to the recipe. You'll want to bookmark this one; trust me.

Special thanks to Katie Havard for finding the amazing recipe!

Bon apetit!

Caroline & Monica

Carefully spread over Oreo crust; then layer with remaining cream cheese batter...I know, it doesn't look pretty or appetizing. YET! Just wait till you bake it and chill it. Drool-worthy, I promise.

Click here for the printable recipe of Blue Velvet Cheesecake

.

Blue Velvet Cheesecake

From

Kraft Recipes

Yield: 10 servings

Total Time: 1 hour cooking + 5 hours to chill

Ingredients

24 Oreo cookies (about 2 cups), finely crushed

1/4 cup butter, melted

6 oz Baker's semi-sweet chocolate, divided

24 ounces (3 packages) cream cheese, softened

3/4 cup granulated sugar

1 teaspoon vanilla

3 eggs

1 tablespoon red/blue food coloring

Directions

1. Mix Oreos and butter in food processor. Press onto bottom of greased spring foam pan. 2. Melt chocolate and set aside. Beat cream cheese, sugar, and vanilla until well-combined. Add eggs. Beat until just combined. 3. Remove 2 cups of cream cheese batter and mix with melted chocolate and food coloring. Carefully spread over Oreo crust; then layer with remaining cream cheese batter. 4. Bake for 26 minutes at 350 degrees, or until center is almost set. Cool completely, and melt remaining chocolate to drizzle over the cheesecake. Chill for 5 hours. Serve & enjoy!

That 5 hours of chilling might possibly feel like the longest

wait of your life, but it's completely worth it.

Dig in

In "Cheesecake", "Oreo", "blue", "dessert", "red velvet"

Pirouette Cookies

Caroline Zhang November 26, 2012

Not gonna lie, I had to surf the web to figure out what these things were called. I've always just refered to them as "the little roly cookies." Even if you don't know their name, you've probably seen them / savored them before.

Also, to be honest, these are pretty challenging. You'll probably mess up the first few; it's practically a given. These are the second batch I've made. I wanted to practice with them a bit before I felt comfortable sharing the recipe with y'all. 

I'd need about 6 more arms if I were to take pictures of all of this, so I'll just describe it in the recipe. But the key is the roll up the cookies right away while they're soft as soon as you can handle them without burning yourself. If they harden, pop them back in the oven for a few seconds. Be patient. These take a bit of practice, but you can get it! They would make beautiful cookies to give away for the holidays, and everyone will be so impressed!

Love,

Caroline

Click here for the printer-friendly recipe.

Pirouette Cookies

Adapted from the cookbook

Cookies

by Hilaire Walden

Yields: 25 cookies

Ingredients

2 egg whites

⅓ cup sugar

½ cup flour

4 tablespoon butter, melted

Directions

  1. Preheat the oven to 375 degrees Fahrenheit
  2. Beat the egg whites until hard peaks form.
  3. Beat in the sugar a bit at a time.
  4. Beat in the flour and melted butter.
  5. Make 4 cookies at a time: Drop a teaspoon of batter onto a greased (or non-stick) cookie sheet. Use a spoon to spread it out into approximately a 4-inch circle with the batter. Do this 3 more times.
  6. Bake the cookies for 3-4 minutes until slightly golden-brown. Do not over-bake.
  7. Take them out of the oven. As soon as they are cool enough to handle, take them off the cookie sheet and roll the circles around the handle of a wooden spoon. If the cookies are too hard to work with, pop them make into the oven for about 10 seconds.
  8. Repeat this for the rest of the batter, doing 4 cookies at a time.
In "Christmas", "cookie", "dessert", "fancy", "holiday"

Nutella-Filled Snickerdoodles

Monica Cheng November 1, 2012

Snickerdoodles are quick and easy to make, and super delicious. It's a recipe shared with me by a dear friend (I absolutely adore all of her recipes, passed down in her family for generations). In my eyes, these snickerdoodles are the new chocolate chip.

Pillowy soft crumb envelopes a dollop of half-melted Nutella filling...Mmm.

Enjoy!
Monica


Nutella-Filled Snickerdoodles

A cookie classic, with gooey Nutella filling.
Yield: 5 dozen
Time: 30 minutes

Ingredients
1 cup shortening
1 1/2 cup granulated sugar
2 eggs
2 3/4 cup all-purpose flour
2 teaspoon cream of tartar
1 teaspoon baking soda
1/4 teaspoon salt
2 tablespoon sugar
2 teaspoon cinnamon

Some Nutella, for filling

Directions
Preheat oven to 385 degrees F. Line cookie sheet with parchment paper.

Mix shortening, sugar, and eggs. Then sift together and stir in flour, cream of tartar, baking soda, and salt. 

Form balls the size of small walnuts and add a small Nutella to the centers of each. 

Roll in a mixture of sugar and cinnamon. 

Place on cookie sheet about 2 inches apart from each other. Bake for about 7 minutes, or until edges are golden but middle is but still soft and not quite baked through. Cool for 10 minutes. Serve & enjoy!


In "cinnamon", "cookie", "easy", "nutella", "snickerdoodle"
← NewerOlder →

Search Posts

Post Archive
  • "easy"
  • "breakfast"
  • "chocolate"
  • "cookie"
  • cake
  • cookie
  • "fruit"
  • "summer"
  • "bread"
  • "Cheesecake"
  • "Oreo"
  • "dessert"
  • "fancy"
  • "Cake"
  • "blueberry"
  • pie
  • "cinnamon"
  • savory
  • breakfast
  • "berry"
  • "brownie"
  • "cupcake"
  • "holiday"
  • "nutella"
  • bars and brownies
  • "apple"
  • "birthday"
  • "pastry"
  • "pie"
  • "scone"
  • bread
  • candy
  • cheesecake
  • "banana"
  • "biscuit"
  • "citrus"
  • "ganache"
  • "lemon"
  • "macaron"
  • "muffin"
  • "strawberry"
  • "vegetable"
  • "almond"
  • "buttercream"
  • "cake mix"
  • "cranberry"
  • "cream cheese"
  • "frosting"
  • "glaze"
  • "healthy"
 

Powered by Squarespace