• About
  • Food Photography
  • Portraiture
  • Contact
Menu

Caroline Zhang Photography

  • About
  • Food Photography
  • Portraiture
  • Contact
×
Cherry Cream Puffs | Pass the Cocoa

Cherry Cream Puffs

Caroline Zhang August 5, 2013

When I was in grade school, my dad used to buy these tubs of cream puffs from Sam's Club, which I would eat them for breakfast. I always ate them frozen (like eating cream puffs for breakfast wasn't bad enough), which gave the filling the consistency of ice cream. I may or may not have been aware of the fact that this was not how they're supposed to be served; but when we defrosted them, they inevitably became wet and soggy and I wasn't that into them.

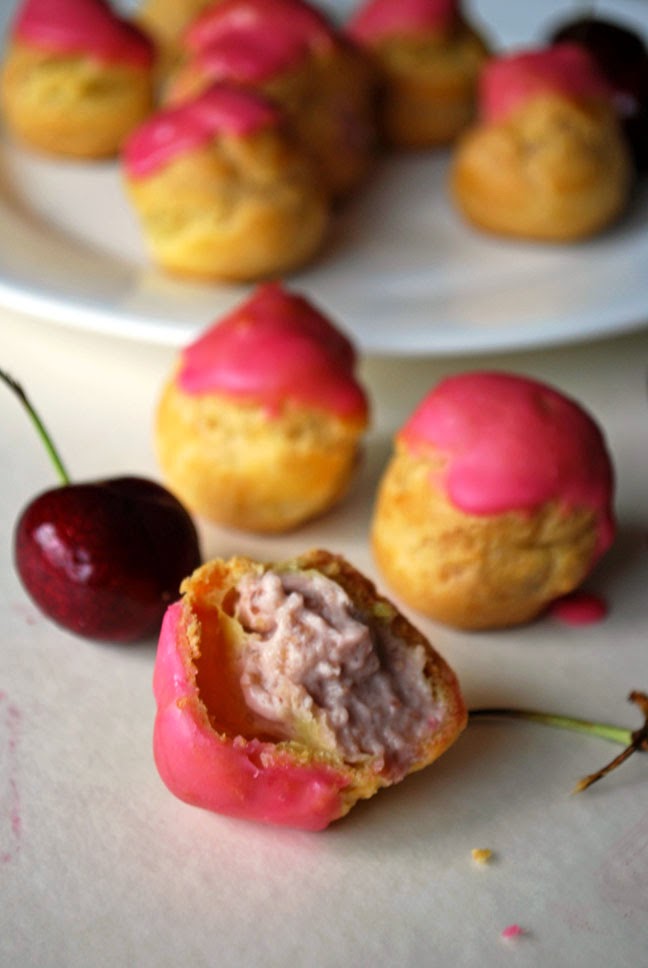
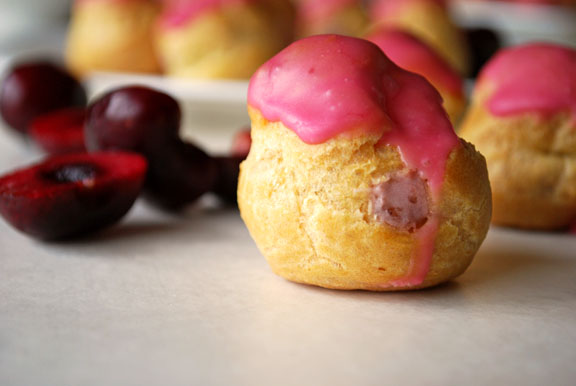
Well, today I present the freshly baked version of those puffs, with a fun summery twist. The choux pastry is light and buttery, a perfect compliment to the cool creamy cherry pastry cream inside. These guys are cute, flavorful, and not soggy at all.

I should confess that these profiteroles were also supposed to be an ego-booster. I had botched another batch of macarons (yes, I'm still at it), and wanted to make something cute and fun. And I sure am glad those macarons didn't turn out right, because these puffs are amazing.

Speaking of cute and fun, I got this recipe from Raiza of Dulce Delight. She bakes all these stunning desserts and does really great and fun how-to videos of everything she makes.

Cherry Cream Puffs | Pass the Cocoa

Pâte à choux may seem intimidating when you're making it for the first time (if only because of the weird French accents), but it's actually surprisingly easy. You have to cook the dough twice, first on the stove-top and then in the oven. (I tried to skip the first step once...yeah, don't do that.)

Choux
Choux

And the filling. I could eat this filling with a spoon, it's so good. Sweet, fruity, creamy but not too heavy...and it definitely doesn't need to be frozen to taste good.

Cherry Pastry Cream
Cherry Cream Puffs | Pass the Cocoa

Make these, you guys. Even if you really like frozen cream puffs. Even if your macarons turn out perfect each time.

Enjoy!

Caroline

P.S. I'm joining the Aspiring Bakers #34 Choux Party hosted by Jasline of Foodie Baker! Check it out (:


Cherry Cream Puffs

Click here for the printer-friendly recipe
Yields 50 - 60 cream puffs
Adapted from Dulce Delight

Ingredients
Pâte à choux
1 ¼ cup water
½ cup butter
¼ teaspoon salt
1 cup all-purpose flour
4 to 5 eggs

Cherry Cream Filling
2 cups cherries, pitted  (raspberry or strawberries could be used as well)
1 teaspoon lemon juice
1 ¼ cup heavy cream, divided
1 cup whole milk
½ cup sugar
4 egg yolks
¼ cup cornstarch

Glaze
1 cup powdered sugar
½ cup cherries, pitted

Directions
For the choux:
Preheat the oven to 400 degrees Fahrenheit. Line two baking sheets with parchment paper. Place the water, butter, and salt in a pot. Cook over medium heat until the butter melts. Take the pot off the stove.

Add flour and stir the mixture vigorously until it comes together in a thick dough. Place the pot back on the stove over medium heat and cook it for another minute or so, stirring constantly, in order to dry out the dough.

Take the pot off the heat, and whisk the dough for a minute or two.

Whisking constantly, add 4 eggs one by one, mixing well after each one. The mixture should be smooth and shiny; if you scoop some batter out of the bowl, it should fall back into the bowl in a thick ribbon. If it is too thick, beat in the 5th egg.

Pour the batter into a pastry bag fitted with a ¼-inch round tip. Pipe 1-inch circles onto the baking sheets. Wet your fingertip and flatten the peaks of the choux you just piped.

Bake the choux for 30 minutes at 400 degrees F until they are a light brown, then lower the temperature to 300 degrees and bake for another 10 minutes with the oven door cracked. Let the choux cool while making the filling.

For the cherry cream filling
Pulse the cherries and lemon juice in a food processor and strain the mixture through a cheesecloth or fine mesh sieve. Discard the pulp or reserve for another use.

Place the cherry juice, ½ cup heavy cream, and whole milk in a saucepan and cook over medium heat until it is just simmering.

In another bowl whisk the egg yolks and sugar until the yolks are pale and fluffy. Whisk in the corn starch.

Temper the egg yolks: slowly pour about ¾ cup of the cherry and cream mixture into the egg yolks, whisking constantly the whole time. Pour the egg mixture back into the saucepan and allow the mixture to boil for about 3 minutes, whisking constantly the whole time.

Take the cream off the heat and allow to cool to room temperature, and then refrigerate for at least an hour.

Once the pastry cream is cool, whisk the remaining ¾ cup of heavy cream until it forms hard peaks. Fold the cherry mixture into the whipped cream.

For the Cherry Glaze
With a fork, press the cherries through a fine mesh sieve until it yields about 2 tablespoons of juice. Mix the juice with the powdered sugar.

Assembly
Using a chopstick or a small pastry tip, make a small hole in each profiterole.

Spoon the cherry cream filling into a pastry bag fitted with a small round tip, about ⅛-inch in diameter. Pipe the cream into the profiteroles.

Dip the top of the profiteroles into the cherry glaze.

Enjoy! These puffs are best served the day they are made


In pastry Tags cherry, fruit, fancy, choux

Reese's Peanut Butter Chocolate Cheesecake

Monica Cheng July 26, 2013

Here's a dessert that rivals any cheesecake that could be found on the Cheesecake Factory menu...

Reese's Peanut Butter Chocolate Cheesecake

!

Because let's be honest, peanut butter is delicious.

This cheesecake is a lot of fun.

...Chunks of Reese's peanut butter cups in the creamy peanut butter cheesecake with a thick layer of delicious dark chocolate ganache and peanut butter drizzle on top. Can anyone say yum?

Head on over to

Melissa's blog, Redfly Creations

, for the recipe! Her blog is one of my favorites not only for its delicious recipes -- for example, 

The Amazing Amish Cinnamon Bread

, which 

I made

! 

-- 

but also for having such wonderfully creative and practical DIY ideas. Hope you enjoy!

-Monica

*

Finely crush Oreos and melted butter in a food processor or using a rolling pin. Press onto the bottom of the springform pan to bake for about 5 minutes.

Beat the

room-temperature

cream cheese just until it first becomes smooth. It's important not to overbeat, or else additional air will be beaten into the mixture, and the cheesecake will not have the right texture.

Add eggs, one at a time, beating just until it first becomes incorporated but not more. Again, don't overbeat the air into the mixture.

Now for the fun part! Add the brown sugar, peanut butter, heavy cream, and vanilla. Mix until just incorporated.

The batter smells wonderful now, doesn't it? Try to resist the urge to taste the batter...but it's okay if you cave (:

Time for ganache!

Isn't it pretty? I used the microwave method instead of the saucepan.

Now the hard part...waiting! Chill the cheesecake overnight, or at least 4 hours if you're in a rush. The longer, the better, the richer the taste.

Aw so pretty! Doesn't it make you want to just take a fork and dig right in? But wait!

Allow me to cut a slice for you. Bon apetit! Check out the recipe on

Melissa's blog, Redfly Creations

.

In "Oreo", "crust", "ganache", "glaze", "guest post", "redfly creations"

Cranberry-Walnut Corn Muffins

Caroline Zhang July 22, 2013

Let’s talk (read: complain) about college food for a second. I realize we are pretty spoiled when it comes to food at Harvard; we have 13 dining halls for only 6000 people, all of which serve endless buffets three times a day, and they have things like fried plantains and mussels and clams (I’ve heard that they used to do lobsters too, before budget cuts. Tragic.) But it’s still just dining hall food: everything is edible, but nothing is amazing. The spaghetti is always undercooked or overcooked, nothing is seasoned enough, and the salad bar never seems to have feta when I want it.

I know, life is hard.

There are, however, a few highlights among the d-hall foods. The waffles, for instance:

And yes, that is the Harvard Veritas logo stamped into my waffle. Veritas + Waffle = Veritaffle. It’s so pretentious that it’s kind of endearing.

I also really like the muffins they serve in the mornings.  They’re warm and soft, and make getting out of bed at the butt crack of dawn (as in, 10 a.m.), that much more bearable. My favorites are the corn muffins; they’re slightly too sweet, but they have that earthy cornmeal flavor and texture while still being light and fluffy. Plus I’m from Indiana, so it’s kind of a requirement that I love corn. Hoosier pride.

These cranberry walnut muffins are light and soft, and have just the right amount of sweetness and hard-to-describe corn flavor.  This recipe is also super easy, and can be made in about 30 minutes flat, from prepping to clean up.

And now, I’m off to go stuff myself with Italian food before I have to

suffer through

enjoy school food again.

Love,

Caroline

Click here for the printable recipe.

Cranberry Walnut Corn Muffins

Yields: 12 Muffins

Adapted from

The Pioneer Woman

Ingredients

1 cup cornmeal

½ cup all-purpose flour

3 tablespoon sugar

1 teaspoon salt

1 tablespoon baking powder

1 teaspoon baking soda

1 ½ cup buttermilk (or 1 ½ cup milk mixed with 1 tablespoon white vinegar)

1 egg

¼ cup butter, melted

2 tablespoons honey

½ teaspoon vanilla extract

1 cup dried cranberries

½ cup walnuts or pecans, chopped

Directions

  1. Preheat the oven to 400 degrees.
  2. Mix together the cornmeal, flour, sugar, salt, and baking powder. Set the mixture aside.
  3. In another bowl, mix together the buttermilk, and baking soda.
  4. Add the dry ingredients to the wet, and mix until just combined. Stir in the butter, honey, and vanilla extract.
  5. Fold in the cranberries and pecans.
  6. Pour batter into a greased muffin pan, and bake for 10-15 minutes, until golden brown and a toothpick inserted into the center of the muffin comes out clean.
  7. Let cool until just warm, and serve.
In "breakfast", "corn muffin", "cranberry", "muffin"

Blueberry Crostata

Monica Cheng July 15, 2013

There are some people I really admire in this world. They are my role models, my inspirations, my guiding lights. In the realm of figure skating, I look up to the Canadian ice dancers Tessa Virtue & Scott Moir (I still can't get over the sheer joy and ecstasy of watching them win the 2010 Vancouver Olympics) since I'm an ice dancer myself. I also love the Russian pairs team Katerina Gordeeva and Sergei Grinkov...They are truly legendary, and Katerina's story in 

My Sergei

is breathtaking.

But before I turned to ice dance, for many years I dedicated myself wholly to skating freestyle. My idols then were Michelle Kwan, Kristi Yamaguchi, Tara Lipinski, and Kim Yuna. In men's figure skating, I loved to watch Evan Lysacek, Evgeni Plushenko (despite his bad attitude), and of course -- the legendary Brian Boitano.

Which leads me to dessert.

Random-much? Not as much as you might think. Brian Boitano was not just perfection on ice. He also found a small stardom off ice otherwise known as his own cooking show on the Food Network! It's called

"What Would Brian Boitano Make?"

Impressive huh?

The recipe that caught my eye was the

Pear and Almond Crostata

, and I was especially inspired by Monica, from

Playing With Flour

, who adapted the recipe to make Blueberry Crostata (Aside: Isn't it cool that we share the same name?). By now you all should know about my obsession with blueberries, so of course I was dying to try out this recipe.

A crostata is an Italian open fruit tart that has a crusted appearance, similar to the French galette. There are endless variations of both sweet and even savory crostatas. Sweet variations use fruit preserves like apricot, cherry, peach, nectarine, or berries. I didn't know this before, but apparently crostatas can also be blind-baked and then filled with pastry cream topped with fresh fruit. Yum.

It's honestly a very easy and pretty quick recipe, with ingredients you probably already have in your kitchen. The only thing I actually had to buy was the almond paste. Easy peasy.

Simply roll out the almond paste into circles, add a dollop of cream cheese filling, and drop some fresh blueberries on top. Just for the sake of extra clarity, I divided the recipe into sections so that it'll be easier to read when it comes to assembly. The result is a crisp, slightly browned crust with a pronounced almond flavor, and creamy filling topped with fresh juicy blueberries. Cheers!

Hope you enjoy!

Love,

Monica

*

First, you need almond paste that will compose the crust of the crostata. I used the canned version over the tube version because it has a more authentic flavor. Confession: I'd never worked with almond paste before, so I was a little nervous initially. I only knew that Panera's Bear Claws had a delicious almond paste filling, but I couldn't imagine that filling as the base and crust that would hold the entire crostata together.

Turns out I had no need to worry at all, because because the texture of the almond paste was perfect for rolling out into a crostata crust. It's

very

soft and malleable, though it can get a little sticky, so I placed it in between two pieces of parchment paper to roll it out into nice, round, flat circles. The circles don't need to be perfect because you'll be folding the edges over the blueberries later on.

Assemble the almond paste, cream cheese filling, and blueberries like so.

Fold the edges of the almond paste over the blueberry filling. The crust is very delicate, so use care.

Voila! Delicious Blueberry Crostata. I'm thinking it'll taste wonderful with a scoop of vanilla ice cream, no?

Click here for printable recipe of Blueberry Crostatas

.

Blueberry Crostatas

Sweet and crisp Italian open-fruit tart filled with fresh juicy blueberries

.

Found on

Playing With Flour

, originally from

Brian Boitano

.

Yield: 4 six-inch crostatas

Time: 45 minutes

Ingredients

For the crust

:

7 ounces almond paste

Preparing the blueberries

:

2 cups blueberries, washed and dried

2 tablespoons granulated sugar

1 teaspoon freshly squeezed lemon juice

1 tablespoon cornstarch

For the filling

:

1 egg

1 1/2 teaspoon water

4 ounces cream cheese, softened

1 tablespoon granulated sugar

1 1/2 teaspoons all-purpose flour (plus more for dusting)

1/2 teaspoon pure vanilla extract

1 tablespoon turbinado sugar (coarse or raw sugar), for sprinkling

Directions

1. Preheat oven to 375 degrees F and line 2 baking sheets with parchment paper.

For the crust

:

2. Divide the almond paste into 4 equal pieces. Lightly dust work surface or a piece of parchment paper with flour. Working with one piece at a time, press the almond paste down with your palm to flatten. Lightly dust a rolling pin and roll almond paste out into a 6-inch round, about 1/8 inch thick. Set onto the prepared baking sheets.

Preparing the blueberries

:

3. Toss the blueberries together with the sugar, lemon juice, and cornstarch to combine.  Set aside.

For the filling

:

4. In a small bowl, crack the egg and beat lightly.

5. Transfer half of the beaten egg to another small bowl and mix in 1 1/2 teaspoon water to make an egg wash; set aside.

6. In a medium-size bowl, combine the remaining half of the beaten egg with cream cheese, sugar, flour, and vanilla. Mix until all incorporated and smooth.

Assembly

:

7. Spread about 2 tablespoons of the cream cheese filling evenly onto the center of each circular almond paste crust, leaving a 1/2 inch border all around.

8. Place blueberries on top of the cream cheese filling of each crostata.

9. Fold the border of the almond paste crust over the edge of the berries, pressing down lightly where necessary to secure it in place. Using a pastry brush, lightly brush the edges of the crostata with the egg wash. Then sprinkle each crostata with turbinado sugar.

10. Bake for 20 minutes, until golden brown. Cool & enjoy!

*

In "boitano", "brian", "fruit", "italian", "tart"
← NewerOlder →

Search Posts

Post Archive
  • "easy"
  • "breakfast"
  • "chocolate"
  • "cookie"
  • cake
  • cookie
  • "fruit"
  • "summer"
  • "bread"
  • "Cheesecake"
  • "Oreo"
  • "dessert"
  • "fancy"
  • "Cake"
  • "blueberry"
  • pie
  • "cinnamon"
  • savory
  • breakfast
  • "berry"
  • "brownie"
  • "cupcake"
  • "holiday"
  • "nutella"
  • bars and brownies
  • "apple"
  • "birthday"
  • "pastry"
  • "pie"
  • "scone"
  • bread
  • candy
  • cheesecake
  • "banana"
  • "biscuit"
  • "citrus"
  • "ganache"
  • "lemon"
  • "macaron"
  • "muffin"
  • "strawberry"
  • "vegetable"
  • "almond"
  • "buttercream"
  • "cake mix"
  • "cranberry"
  • "cream cheese"
  • "frosting"
  • "glaze"
  • "healthy"
 

Powered by Squarespace