For the past month, Monica and I have lived, breathed, and dreamed tiramisu. As I've hinted on Instagram, we experimented with so many iterations of this humble Italian dessert that we've bought almost our weight in mascarpone cheese, and are still slightly buzzed from the coffee.
Monica and I have partnered with Skillshare, an online learning community, to create a series of baking videos on making tiramisu. Professionals and dedicated amateurs can share their skills--from cooking to photography to marketing--through digital classes. Our class, "How to Make Tiramisu Without Being Cliche," walks you through creating a traditional tiramisu from scratch, as well as two more creative variations.


We were mildly flabbergasted that a videographer for Skillshare (thanks, Arron!) was actually going to travel to Indiana to film us. Learning to explain our baking process to the camera was quite a learning curve (we spent a good 15 minutes laughing at our first edits!), but I'm so excited about the recipes we developed. In addition to a very traditional tiramisu, we created a tiramisu-flavored charlotte (a British cream and sponge cake dessert), and a tiramisu French opera cake.
We're sharing that tiramisu charlotte recipe here today, but if you would like to watch us walk you through this and two other recipes through step-by-step videos, do sign up for our Skillshare class. The referral link, which gives you a free trial, is here.
Stay warm, my fellow East Coast-ers!
-Caroline
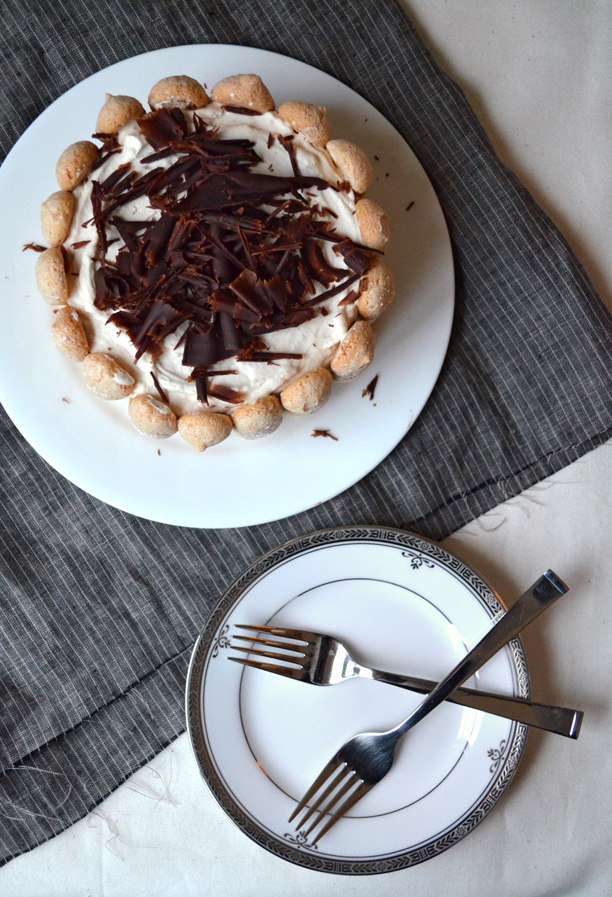
TIRAMISU CHARLOTTE
Yields: one 6-inch charlotte
Click here for the printer-friendly recipe.
Ingredients
For the Ladyfingers
½ cup all-purpose flour
2 tablespoons cornstarch
¼ teaspoon salt
3 eggs, separated
½ cup granulated sugar, divided
¼ cup powdered sugar
For the Mascarpone Cream Filling
2 tsp powdered gelatin
3 tbsp water
1 ½ cup heavy cream
½ cup powdered sugar
8 oz. mascarpone cheese
2 tbsp Marsala
1 tbsp espresso
For Assembly
½ cup toasted chopped hazelnuts
¼ cup espresso, cooled
1 tbsp Marsala
For the Chocolate Curls
2 oz. dark chocolate
½ teaspoon vegetable oil
Directions
Make the savoiardi. Preheat the oven to 325 F. Line two large cookie sheets with parchment paper. Find a 6-inch cake pan or pot to use as your Charlotte mold. Use the pan to draw a 6-inch circle on the parchment paper. Turn the paper upside down on the cookie sheet so that you don’t get ink on your savoiardi.
Sift the flour, cornstarch, and salt over a piece of wax paper.
Whisk together the egg yolks with ¼ cup of granulated sugar until the yolks become a very pale yellow and double in volume. Fold in the dry ingredients.
Add the egg whites and remaining ¼ cup of sugar to a mixing bowl and whisk until stiff peaks form. For best results, start whisking with the electric mixer set on low speed, and gradually increase speed.
Fold about ⅓ of the egg whites into the egg yolk/flour mixture to lighten. Fold in the remaining egg whites, until just combined.
Spoon the batter into a piping bag. Fill in the circle you drew on the parchment paper, leaving a one-inch border from the edge. (You will get a cookie round that is slightly smaller than the base of your pan). Use the rest of the batter to pipe 4-inch long ladyfingers on the other cookie sheet.
Bake the ladyfingers for 25-30 minutes, rotating the cookie sheets halfway through, until golden brown and crispy. Bake the cookie round for another 10 minutes. Let cool completely.
Make the mascarpone cream filling. In a small bowl, combine the gelatin and water. Microwave for 15-20 seconds, until the gelatin is liquid and melted. Let cool to room temperature.
Whisk the whipped cream to soft peaks. Whisk in the powdered sugar. While whisking continuously, slowly pour in the liquid gelatin.
In a separate bowl, whisk together the mascarpone cheese, Marsala, and espresso. Fold the the whipped cream into the mascarpone mixture.
Line charlotte mold you are using with foil or plastic wrap. Trim one end of the ladyfingers, so that the bottom is even and they are all about the same height.
Place the cookie round in the bottom of the pan. Stand up the ladyfingers around the perimeter of the pan. You may need to spread a little of the cream filling on the base first, so that the cookies have something to stick to.
Mix together the espresso and Marsala. Spread about ⅓ of the mascarpone cream mixture on top of the cookie round. Dip a few of the remaining ladyfingers in the espresso mixture, and place on top of the cream. Be careful not to let them touch with the ladyfingers along the edge of the pan, or else the walls of your charlotte will go soggy. Sprinkle with about half of the hazelnuts.
Repeat this process again with the remaining mascarpone cream, ladyfingers, and hazelnuts, finishing with a final layer of cream on top.
Refrigerate overnight to let the filling set.
Make the chocolate curls. Melt the chocolate in the microwave on medium power in 20 second bursts. Mix in the vegetable oil.
Turn a clean baking pan upside down, and spread the chocolate in a thin layer of the bottom of the pan. Refrigerate for about five minutes, until the chocolate is set but not too hard.
Using a metal spatula, press the edge against the chocolate and scrape away from you until chocolate makes curls.
Using the edges of the foil or plastic wrap, gently lift the Charlotte out of the pan. Peel away the foil. Top with chocolate curls and serve!

Check out our Skillshare class to watch us make this tiramisu opera cake!