
There's this part of Harry Potter that always has confused me: Harry and his friends go down to have tea with Hagrid, and he serves them these things called "rock cakes" that they nearly break their teeth on. Rock Cake? Like, cakes made out of marble? What?
It was only recently that I finally found out what rock cakes were: SCONES. Rock cakes are what the British called
scones.
And it's not the only baked good that has a different name on the other side of the pond. To clarify, I, Caroline, am posting this handy glossary:
Britain
United States
Rock Cakes
Scones
Scones
Biscuits
Biscuits
Cookies
Confusing, huh? But don't worry, scones/rock cakes are actually super easy to make! It's amazing how educational Harry Potter is.
Today, I'm giving you a basic scone recipe, or a master recipe, and I'll show you the process of making the dough. You then can decide to add in whatever you like to make scones to your taste! Be creative!
Tomorrow, I'll also post a scone recipe that uses this master recipe as a starting point.
But first, the basic scone! Here are two tips that are essential to a light, fluffy scone:
- The butter must be very cold. Do not let it warm up too much while making the dough.
- Do not over-mix when you add the wet ingredient to the dry ingredients. You want to mix it just to the point that the wet ingredients are incorporated into the dry.
And now here's the process:
(These photos may look familiar...they're from my blueberry scones post, but the recipe I'm posting is somewhat different.)
Whisk together your dry ingredients: flour, baking powder, salt, and sugar

Cut your butter into 1/2-inch cubes, and add that to the bowl. The butter should be very cold.

Using a pastry cutter or your hands, work the butter into the flour mixture. It's okay if there are lumps. Work quickly so the butter doesn't melt.

Add your mix-ins, such as chocolate chips or fruit. The exception is citrus zest, which you'll add in later.

Mix in whatever you are adding to the scones.
Then, in a separate bowl, whisk together the cream, egg, vanilla extract, and citrus zest, if you are using it.


Add the wet ingredient to the dry, and mix them together just until the dry ingredient are moistened. DO NOT OVER-MIX!

Turn the dough onto a floured surface and shape it into a circle that is about 10-inches in diameter.
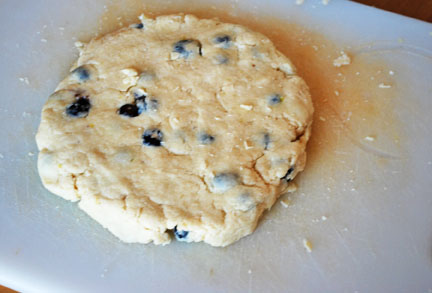
Cut the circle into 12 wedges.
Place the scones onto a greased baking sheet. If you are not making a glaze to drizzle over it later, then sprinkle some sugar over the scones.
(Originally, I suggested first brushing the scones with milk, but with this new recipe I think it is unnecessary).
Bake for about 15-18 minutes at 375 degrees Fahrenheit, until they are golden.
If you are making a glaze instead of sprinkling sugar, mix together the powdered sugar and milk or citrus juice, and brush it generously over the the scones.
Have fun experimenting with this recipe!
-Caroline
Click here for the printer-friendly recipe
Master Scone Recipe
A Pass the Cocoa Original
Yields: 12 Scones
Ingredients:
Dough
2 cups flour
1 tablespoon baking powder
½ teaspoon salt
3 tablespoons granulated sugar
8 tablespoons butter, cold
One or two add-ins, such as: 1 cup fresh fruit such as blueberries, cherries, or raspberries, ⅔ cup chocolate chips or dried fruit such as cranberries, or 1 tablespoon citrus zest
2/3 cup half-and-half, or heavy cream, cold
1 egg
½ teaspoon vanilla
sugar, for sprinkling or a simple glaze (see below)
Basic glaze:
1 cup powdered sugar
¼ cup milk, or lemon/orange juice
Directions:
- Preheat the oven to 375 degrees Fahrenheit.
- Sift together the flour, baking powder, salt, and sugar.
- Cut the butter into ½-inch cubes. Make sure it remains cold.
- Add the butter to the dry ingredients.
- Using a pastry cutter, two knives, or your hands, cut the butter into the flour. It’s okay if a few lumps remain. Work quickly so that the butter doesn't melt.
- Fold in any add-ins, unless you are adding citrus zest.
- In a separate bowl, whisk together the half-and-half or cream, the egg, vanilla, and citrus zest, if you are using it.
- Pour the wet ingredients into the dry ingredients.
- Use a fork or wooden spoon to mix it until the dry ingredients are moistened and the dough barely holds together. DO NOT OVER-MIX.
- Turn the dough onto a floured surface.
- Shape the dough into a circle 10 inches in diameter.
- Cut the circle into 12 wedges.
- Place the scones onto a greased baking sheet and bake for 15-18 minutes, until golden. Let cool.
- For the glaze, mix together the powder sugar and milk (or lemon juice or orange juice). Brush the glaze over the scones.
- Give yourself a huge congratulations! You just made scones!