I first learned food photography alongside my co-writer Monica when we created our blog, Pass the Cocoa. Though we did eventually move on from our project, all of our recipes are still housed on this site.

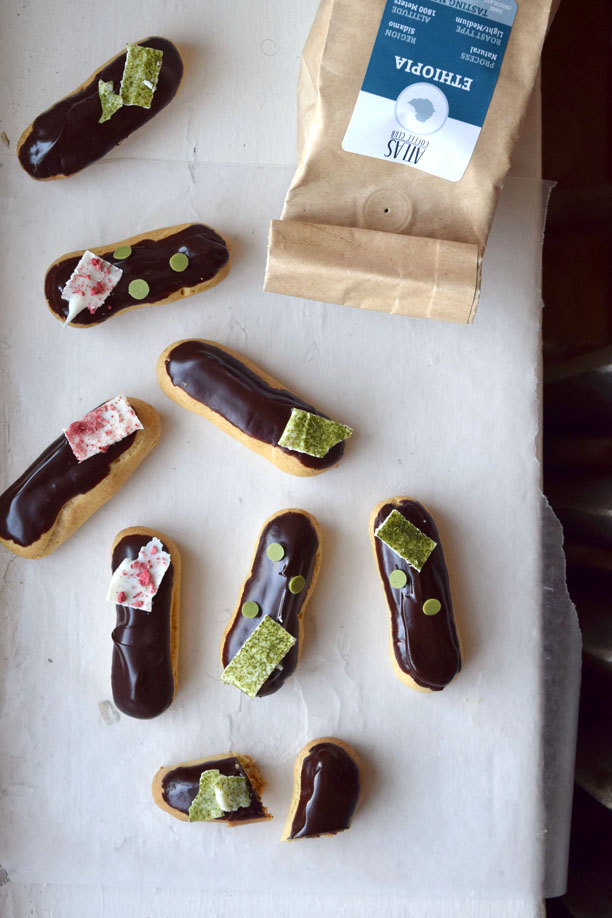
Irish Coffee Eclairs
Cream as rich as an Irish brogue
Coffee as strong as a friendly hand
Sugar sweet as the tongue of a rogue
Whiskey smooth as the wit of the land.
-Joe Sheridan's Irish Coffee Recipe, 1943
Choux pastry is a nemesis. I'd be the first to admit that I'm quite complacent in my baking. No prayers and shortcuts in the kitchen; I've grown accustomed to expecting most things to turn out the way I planned--or at least, to look and taste pretty good.


There is a handful of exceptions to that rule; choux is one of them. The first few times I made choux in a college dorm were unqualified disasters, soggy and egg-y lumps of dough or flat, collapsed disks. I've definitely improved my understanding of this strange, twice-cooked dough, but choux still has me imploring Saint Honoré and peering anxiously into the oven window to see if my eclairs are rising.
However, homemade eclairs are absolutely, completely worth it. It's so hard in most places to find eclairs and cream puffs with choux shells that are still crispy and filling that is rich and creamy and not thinned out with fake flavors and fats.

I ironically had to give up coffee during the last few weeks of writing my thesis because it was making me too jittery. But the thesis is in, the caffeine is flowing again, and I couldn't help but pair it with some Irish whisky, cream, and chocolate and stuff it inside an eclair.
For this recipe, I received a wonderful sample of a light roast Ethiopian coffee from Atlas Coffee Club, a subscription service that provides coffees from around the world. Their Ethiopia Sidamo coffee is light, fragrant, and fruity. It's strong enough to lend body and flavor to the Irish coffee pastry cream in the eclairs, but smooth and delicate enough to balance with the whisky I added.
And since the chocolate glaze looked a little plain on its own, I decorated the eclairs with white chocolate sprinkled with matcha, and green matcha polka dots. It seemed appropriate given Saint Patrick's Day and the Irish poetry thesis.
-Caroline
Atlas Coffee Club provided me with a free sample of their coffee to review. All opinions are my own.

Irish Coffee Eclairs
Yields: about 40 three-inch eclairs
Ingredients
For the Choux Pastry
1 cup water
½ cup unsalted butter
½ teaspoon salt
1 teaspoon sugar
1 cup all-purpose flour
5 eggs
For the Irish Coffee Pastry Cream
⅔ cup granulated sugar
¼ cup cornstarch
⅛ teaspoon salt
5 egg yolks
1 ¼ cup half and half (see notes)
1 cup strongly brewed coffee, hot
3 tablespoons Irish whiskey, divided
5 tablespoons unsalted butter, cubed
For the Chocolate Glaze
6 ounces bittersweet chocolate, roughly chopped
¾ cup heavy cream
For Decoration (Optional)
4 ounces white candy melts or white chocolate (see notes)
1 teaspoon matcha powder
1 tablespoon finely chopped freeze-dried strawberries
Notes
You could substitute the half and half with a combination of whole milk and cream. I would advise against using all milk; the pastry cream requires some fat for flavor and texture.
Though I’m usually a snob about chocolate, I would advise using white candy wafers, or white chocolate without actually cocoa butter for the decorations (I used Nestle brand), since it doesn’t require tempering and will set more firmly.
Directions
Preheat the oven to 425 F. Line two baking sheets with parchment paper. Place the water, butter, and salt in a pot. Cook over medium heat until the butter melts and the water begins to simmer. Take the pot off the stove.
Add flour and stir the mixture vigorously until it comes together in a thick dough.
Place the pot back on the stove over medium heat and cook it for another 3-4 minutes, stirring constantly, in order to dry out the dough.
Take the pot off the heat, and let the dough cool for about 5 minutes. Give it a few stirs to help it cool off. Whisking constantly, add 4 eggs one by one, mixing well after each addition. It will seem impossibly lumpy, but keep mixing and the batter will come together. The mixture should be smooth and shiny; if you scoop some batter out of the bowl, it should fall back into the bowl in a thick ribbon and hold its shape on the surface of the batter. If it is too thick whisk the 5th egg in a separate bowl, and add it a spoonful at a time, until the batter reaches the right consistency. (Don’t add the 5th egg all at once, or the batter may become too runny).
Pour the batter into a pastry bag fitted with a ½-inch round tip. (Or simply snip off the end of a gallon size Ziploc bag). Pipe 3-inch lines onto the parchment paper. Wet your fingertip and flatten any peaks in the batter you just piped.
Bake the choux for 20 - 25 minutes at 425 F until they are a golden brown. Turn off the oven and crack open the door, and let the choux sit for 15 more minutes. The choux should be hollow and completely dry on the inside. Let cool completely.
Make the microwave Irish coffee pastry cream (though you certainly could make it the traditional way over a stove). In a large microwaveable bowl, whisk together the cornstarch, sugar, and salt, breaking up any clumps in the cornstarch.
Whisk in the cream, followed by the egg yolks. Whisk until completely smooth. While mixing continuously, add in the hot coffee. Add in the cubed butter.
Microwave on full power for 6 to 8 minutes (it will depend on the power of your microwave), stopping the microwave and mixing the pastry cream every minute or so. The pastry cream is done when it begins to boil and and thickens to a pudding-like consistency.
Cover the pastry cream with a piece of plastic wrap. Refrigerate overnight, or for at least 3-4 hours to allow the cream to chill and set.
Put the pastry cream in a piping bag with a small round tip.
With a sharp knife, poke two evenly spaced holes in the bottom of each eclair that are large enough for the tip of the piping bag.
Pipe the pastry cream into both holes of each eclair until they are filled and feel heavy in your hand.
Make the chocolate glaze. Heat the cream on the stove or in the microwave until it just begins to simmer. Add the chocolate. Let sit for a minute, then stir until combined and smooth.
Dip the top of each eclair in the chocolate, and place onto a cookie sheet to set.
Make the decorations, if desired. Melt the white candy melts and divide roughly in half between two wax paper-lined cookie sheets. Spread into a thin, even layer. Sprinkle half with freeze-dried strawberry, and dust the other half with matcha. Let set completely, then cut into small pieces to place on top of the eclairs. You can also reserve a little bit of the candy melt and mix in some matcha powder to color it green. Pour the candy melt into a ziploc bag, and pipe small dots. Let set, and place ontop of the eclairs.
Store eclairs in the refrigerator. They are best they day they are made, but can keep for 2-3 days.
No Bake Blood Orange Cheesecake Tartlets
Noting that my senior thesis is due in six days,
Alarmed by the amount of writing I still haven't done,
Deeply conscious of a craving for something sweet, brought on by stress eating,
Observing how far away the dorm kitchen is,
Expressing my deep exasperation at the fact that this cheesecake wouldn't set when I tried to make it in a cake pan,


I, Caroline, hereby
Proclaim the existence of this wonderful cheesecake tart that requires no oven or walks in the cold to the kitchen
Congratulate myself on salvaging the orange cheesecake that wouldn't set but tasted really good,
Encourage all stressed college students (as well as humans of the non-college non-stressed variety) to make this cheesecake.
Signed,
Caroline Zhang
thesising senior


No Bake Blood Orange Cheesecake Tartlets
Yields: six 4-inch tartlets
Ingredients
For the Crust
2 cups graham cracker crumbs
8 tablespoons unsalted butter, melted
For the Filling
8 oz. white chocolate
16 oz. cream cheese, room temperature
¼ cup powdered sugar
½ cup freshly squeezed blood orange juice
zest of two medium blood oranges
For Assembly
1 blood orange, thinly sliced
zest of one blood orange, for sprinkling (if desired
Directions
Make the crust. Mix together the graham cracker crumbs and melted butter. Distribute equally between six mini tart pans.
With a spoon or your hands, firmly press the graham cracker mixture evenly along the sides and bottom of the tart pans. Refrigerate for at least 15 minutes to allow the crust to firm up.
Make the filling. Place the white chocolate in a microwave safe bowl, and microwave on medium power for about 90 seconds, or until the chocolate is melted. Make sure to stop every 30 seconds to give it a good stir or else the white chocolate might burn. Let the chocolate cool until it is lukewarm, but not set.
With an electric mixture (or some elbow grease), whisk the cream cheese with the powdered sugar in a large mixing bowl until it is light and fluffy, about 5 minutes. Whisk in the zest and blood orange juice.
While whisking continuously, pour in the melted white chocolate, and whisk until smooth. (If you pour in the chocolate while it is still hot, it may form lumps in the cheesecake).
Spoon the cheesecake mixture between the six tart pans. Refrigerate for at least 2 hours, or overnight. Decorate with orange slices and zest, and enjoy!
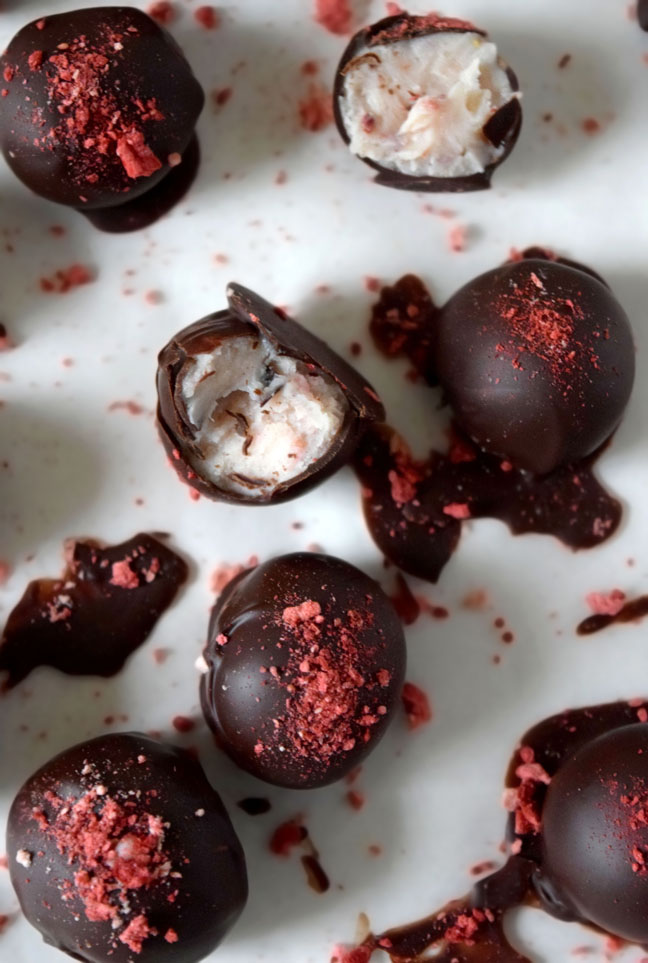
Strawberry White Chocolate Truffles

I'm in that funny floating state of sleep-deprivation at the moment, after tumbling into bed around four in the morning (I seem to write best in the late, late hours of the night, and have yet to convince my brain otherwise). The much-anticipated senior spring will come, I'm sure, but at the moment, I'm bouncing between a mild frenzy to finish writing my thesis and gnawing worry over that dreaded question, "What am I doing after graduation?"
I can't say I'm in the mood for any sort of Valentine's Day baking at the moment, but I seem to still want chocolate. Chocolate truffles are a nice study break, easy to make in my microwave without needing to leave my room. I don't like the pressure that Valentine's Day seems to put on all parties involved--on the wallet, on couples to make some sort of romantic gesture, on single people to justify our single-ness--so I'll just say that these are perfect for sharing and gifting, impressive-looking without requiring much effort. (For a more quantified measure of romantic, effortless desserts, I'll refer you to Monica's and my very scientific post from last year).


The only remotely tricky part of this recipe is tempering the chocolate for coating the truffles, but it really only requires one more bowl and two extra minutes of your time than melting chocolate the normal way. You could of course skip this step, but tempering chocolate gives it that classic shiny finish, and allows it to be solid at room temperature.
My words all seem to have gone into the 15,000 for my thesis and I can't string together anything elegant to say right now, so I'll say it inelegantly: these truffles made me really happy. It was nice to flex my candy-making muscles, and see that special ability of a box of nice chocolates to bring joy.
Caroline
Strawberry White Chocolate Truffles
Yields 18-20 truffles
Ingredients
⅓ cup heavy cream
1 tablespoon butter
8 ounces good quality white chocolate, roughly chopped
pinch of salt
¼ cup finely ground freeze-dried strawberries
For Assembly
5 ounces good quality dark chocolate
1 tablespoon finely ground freeze-dried strawberries, for sprinkling
Directions
Place the heavy cream, butter, and white chocolate into a microwaveable bowl. Microwave on medium power for about 90 seconds, or until the chocolate is melted. Make sure to stop every 30 seconds to give it a good stir or else the white chocolate might burn.
Stir in the salt and freeze-dried strawberries. Refrigerate for 3-4 hours, or until the mixture becomes very firm.
Scoop out tablespoonfuls of the truffle mixture, and roll them into balls. Place on a lined cookie sheet and refrigerate for another 5 to 10 minutes.
Prepare and temper the chocolate coating (Stick with me here; it’s not nearly as difficult as it sounds!) Place about 4 ounces of the dark chocolate in a microwaveable glass or ceramic bowl, and microwave on medium power for about 90 seconds (or until the chocolate is melted), stopping every 30 seconds to give it a stir.
Place the remaining 1 ounce of chocolate in a glass or ceramic bowl (I think the ability of glass and ceramic to absorb heat yields better results than plastic). Pour the melted chocolate into the bowl with the unmelted chocolate, but don’t worry about scraping out every bit of the chocolate. (In other words, leave a little bit of chocolate in the bowl--you’re going to need it again).
Stir the chocolate until the it has cooled down quite a bit, and most of the remaining 1 ounce of chocolate has melted. When you put a bit of melted chocolate under your bottom lip, it should feel cooler than the surface of your skin. Fish out any bits of unmelted chocolate.
Return all of the melted chocolate to the original bowl, and let the residual heat from the bowl and remaining chocolate to slightly bring up the temperature of the chocolate again. Your chocolate is now tempered and ready for dipping!
With two spoons, dip the truffles in the melted chocolate. Decorate by sprinkling a little freeze-dried strawberry on top of each truffle. You will want to be organized, since the chocolate sets pretty rapidly.
Store in the refrigerator. For a softer truffle, serve at room temperature.