
With Christmas just a week away, do you have a special breakfast planned for this most wonderful time of year? Leave it to Nora of Buttercream Fanatic to come up with the perfect way to start Christmas day. It's crunch time for us college students for finals, and we are so, so excited/happy/honored that Nora agreed to write a guest post for us. Nora is an incredibly sweet, talented, and witty woman who not only juggles her work and studies but also is able to find the time in between to indulge her sweet tooth with delicious baked goods (like Hazelnut Pumpkin Pie and Better-Than-Starbucks Cinnamon Scones). And we'll now leave this post in Nora's capable hands to show us how to make these awesome cinnamon rolls. - Monica and Caroline.
Happy holidays, Pass the Cocoa readers! My name is Nora, and I'm usually waxing poetic about something sugary or other over at
Buttercream Fanatic, which you may know as the place where you saw this mouth watering cheesecake that Monica and Caroline were generous enough to let me share while I was on vacation earlier this year. So you'd better believe I jumped at the chance to return the favor, especially if it means giving these two hard-working ladies some time to enjoy their winter break! I still can't believe they are full time students and still find time to cook, photograph and share such gorgeous baked creations. Talk about talent!
When they asked me to guest post around the holidays, of course my mind went to Christmas cookies, the obvious choice for this time of year. But I'm starting to realize that many people have their own tried-and-true recipes for their favorite cookies that they turn to every year, and those who don't have eleventy billion other bloggers, Food Network chefs, and Pinterest pinners to help them out. But you know what gets overlooked in all of the Christmas cookie chaos? Breakfast. Yes, that's right, the humble, and completely underrated Christmas breakfast. Um hello, where do you think you get the energy to tear open all that wrapping paper?? Respect the breakfast, guys.
Now, Christmas breakfast is a tricky one because you need something decadent and carb-y and sweet (because A. it's breakfast on a special occasion and B. if your family is like mine, all you really want for breakfast is cookies anyway), not to mention festive (see: tree, etc), but you also don't want something that will in any way show up the elaborate lunch or dinner that you and your family have been or will be probably slaving over for hours, if not days.


Enter: the cinnamon roll. Sweet, carby comfort food? Check. Festive? Check, because I added sprinkles. Won't upstage? Double check. Cinnamon rolls, at least of the homemade persuasion, are time-consuming enough that my guess is you don't eat them every day. But they are still not so outrageous as to take the focus away from the tree, what's under it, or the special meal later in the day. It's a perfect match.
This recipe makes enough for a crowd (3 pans!), so for those of you who host friends or extended family for the holidays, never fear: no one will go hungry. If you aren't the host, these will work great for you too as they travel quite well.
The recipe calls for two different types of fillings. First there is the traditional cinnamon-sugar combination that really makes a cinnamon roll a cinnamon roll. Second, there is a fig and orange filling for the adults but, honestly, everyone who has tried these preferred the cinnamon filling regardless of their age, so if you are a fan of the classics, feel free to omit the fig and orange flavor, double the cinnamon-sugar recipe, and just make cinnamon rolls. I like the idea of having a slightly more sophisticated flavor option for the adults, and the classic cinnamon sugar for the kids, which is why I offered both.


So that's the good news. The bad (well, less convenient) news is that cinnamon rolls are a form of yeast bread, and yeast is scary, right?
Wrong
. I sympathize. Really, I do, as I used to be on the yeast-is-terrifying bandwagon right there with you. As long as you have unexpired yeast, you proof it properly, and you provide it good rising conditions, you'll be fine. In plain English this means:
- Check the expiration date of your yeast to make sure you are well within range. If you have any doubts, buy a new package. Also, it is best to keep your yeast in the fridge or freezer. Technically, this only applies to opened packages, but I always just pop the envelopes in the fridge as soon as I get home from the grocery store. As a bonus, it helps you remember where you put them! But any cool, dry storage place will do for unopened packages.
- Follow the proofing instructions in the recipe exactly. You need all three ingredients - the yeast, the water at a very warm, but not boiling hot temperature, and the sugar - to "wake up" the yeast properly. The original recipe doesn't call for proofing the yeast, but I always do it as a precaution. I'd rather spend that extra one minute of prep time, and then let the yeast proof while I'm assembling the other ingredients, than risk the dough not rising properly.
- When your yeast is rising, act like a baby is sleeping. No, loud noises won't affect your dough, but the actions associated with them will. That means try not to slam the oven door, drop stuff on the counter above or nearby, or run or jump near the oven. I know it sounds excessive, but the yeast is really doing hard work rising the bread. It's basically defying the laws of gravity if you think about it!* Not jostling or disturbing it allows it the best environment in which to do its work. And don't forget, opening the oven door before the yeast is risen is no good either. The yeast needs peace, quiet and warmth to turn into a beautiful risen butterfly, and opening the oven will let out the warm air.
*slight exaggeration
The bottom line is this: Working with yeast is totally doable, so try not to let yourself be afraid of the yeast, or the effort involved in this recipe. It's well worth it: a full belly and satisfied taste buds make opening gifts even more fun!
Happy holidays, everyone!

Christmas Morning Cinnamon Rolls
From Buttercream Fanatic, adapted from Smitten Kitchen
Ingredients
For the dough:
1 package (about 2 1/4 teaspoons) active dry yeast
1/2 cup + 1 teaspoon granulated (white) sugar
1/4 cup very warm water + more for boiling
3/4 cup whole milk
3 Tablespoons unsalted butter
3 1/2 cups unbleached all purpose flour, plus more for kneading and dusting the cutting board
1 large egg
1 teaspoon salt
nonstick vegetable oil spray
For the filling:
3 Tablespoons unsalted butter, melted
1 cup granulated sugar
1/3 cup cinnamon (more to taste)
3/4 -1 cup fig preserves
zest of 1 large orange (about 2 Tablespoons, loosely packed)
For the glaze:
1 cup confectioner's (powdered) sugar
1 1/2 Tablespoons milk
Preheat the oven to warm. In a small pot, bring about 2" of water to a boil. No need to be scientific with the amount of water here. This is going to be steam heat to help the dough rise.
In a small bowl, quickly mix the yeast and 1 teaspoon sugar. Immediately add the 1/4 cup warm water and gently stir once or twice to moisten all of the yeast granules. Set aside, and don't touch! After 5 minutes, the yeast should have come alive and started to froth and foam.
While the yeast is waking up, combine the milk and butter and microwave 30-45 seconds, just until the butter is melted. Set it aside for a second. Add the dry ingredients (flour, remaining sugar, salt) to the bowl of an electric mixer fitted with the paddle attachment and mix a few times to blend. Add the egg, butter/milk mixture (which should now be warm to the touch, but not hot), and yeast slurry. Mix to blend moist ingredients evenly throughout the wet ingredients, and then switch to the hook (kneading) attachment. The dough may be quite sticky. If this is the case, add flour, 1 Tablespoon at a time, until the dough forms a ball.
Generously coat a large mixing bowl (glass is preferable, but plastic or metal is ok too) with nonstick cooking spray and turn the dough ball into it. Cover with a piece of plastic wrap directly on the dough, but do not adhere the cooking wrap to the sides of the bowl so that it will not impede the rising process. Turn off the preheated oven, and immediately place the covered dough in its bowl on the top rack. Put the pot of boiling water, uncovered, on the lower shelf of the oven. Quickly close the oven door, and do not open again for 2-3 hours.
After the first rise is over, carefully remove the dough (and the pot of water) from the oven and use a sharp knife to cut it in half. The dough will deflate dramatically, but that's ok. Grease 3 8x8" baking dishes or 9" pie plates and preheat the oven to warm. Turn one half of the dough onto a liberally floured cutting board, and roll it out into a fat rectangle (fat meaning the shorter side is not too much shorter than the longer side), long side perpendicular to you. It should be approximately a quarter inch thick. Spread the fig preserves in an even layer, and evenly sprinkle the orange zest on top of it. Bring the fillings to about 1/4" from the edges.
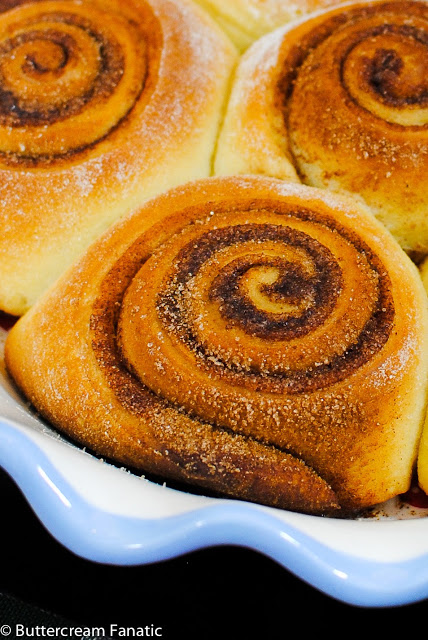
Starting at the side furthest away from you, gently roll the dough into itself, keeping the roll relatively tight, until it is completely rolled in a long log. Use a sharp knife to cut into 3" slices, discarding the ends. Divide pieces evenly between prepared baking dishes (6 per dish), leaving room around each roll to expand. Now mix the cinnamon and sugar in a small bowl and repeat the process with the other half of the dough: roll out, slather evenly with melted butter, sprinkle on the cinnamon-sugar mix, roll and slice. Arrange in the other baking dish, leaving space around each one.
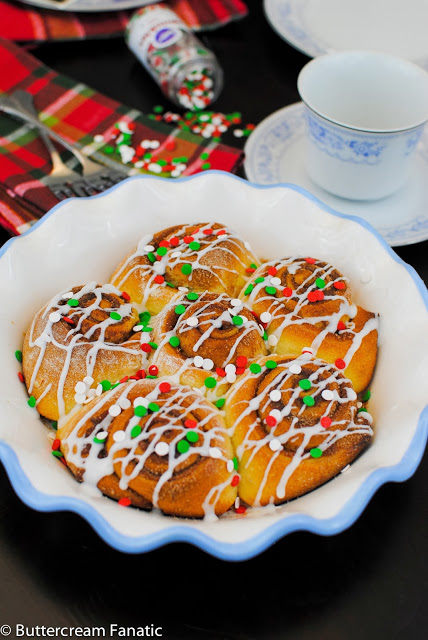
Put the baking dishes in the preheated oven and immediately turn the oven off. Allow to rise for 45 minutes to an hour. Once the second rise is complete, remove the dishes from the oven, preheat to 375F, and bake for 15-17 minutes or until tops are golden. Allow to cool slightly while you are making the glaze, which you can do quite easily by vigorously mixing together the sugar and milk until smooth. This will take some time, as the sugar will not dissolve immediately. Resist the urge to add more milk! Just keep stirring. The finished product will be a thick, viscous texture which will allow it to stick to the rolls in the ooey, gooey way that cinnamon roll frosting should. If you use more milk, it becomes so thin that it will slide right off.
The sooner these are eaten, the better. If you must store them, do so in an airtight container, unglazed, and a room temperature for 1-2 days. Note that they dry out easily, so you may want to warm them in the microwave next to a small bowl of water. Glaze immediately before serving. Makes 18 rolls.