• About
  • Food Photography
  • Portraiture
  • Contact
Menu

Caroline Zhang Photography

  • About
  • Food Photography
  • Portraiture
  • Contact
×

Pumpkin Roll

Monica Cheng December 15, 2014

Whew! Feels great to be done with all those final papers and be back home for the winter (: With the amount of writing Caroline and I have done for our classes this semester/quarter, I bet we could just about publish a small novella! Some kind of fusion between the post-British Empire and bioethics/health activism...hmmm. That would be interesting

And of course, I must give my two cents on the topic of weather now that I'm back home. Here I am bundled up in my thickest furry coat, already acclimated to the 20-30 degree Chicago weather, and then I arrive home to a balmy 50 degrees. Seriously, the temperature difference between Chicago and Indiana never fails to astonish me. Winter coat? Who needs that? I'll just wear this T-shirt, thank you very much

So I might be a little crazy for still making pumpkin recipes in the middle of December, but when I came across these pumpkin rolls...GAH, I just couldn't help myself. I was in a very pumpkin mood all of a sudden. I hope you guys will forgive me...I dusted the rolls with powdered sugar so that it looked snowy and pretty (:

I've always wanted to try making a cake roll, so I was pretty excited to make these pumpkin rolls. It seemed really intimidating at first because there are always the warnings of a cracked cake or something that doesn't work out in the cake-rolling steps. But luckily I had no trouble at all working with the cake, and I think it turned out all right, don't you think?

It's actually a lot easier than I expected; I don't really have any special advice other than to make sure the baking sheet is well-greased so that it is easy to transfer the cake to the parchment paper for rolling.

Seriously, these are de-li-cious and make for a stunning presentation (especially if you make in the autumn months). The pumpkin cake is super moist and flavorful, and the cream cheese filling is on point. I bet it would be even more tasty with cinnamon cream cheese. Mmm...

I'm definitely making these cake rolls again, maybe experimenting with different flavors and filling combos. Hope you guys give these pumpkin rolls a try, if not this year then next fall!

Cheers,
Monica

Two months ago: Pumpkin Nanaimo Bars
One month ago: Flourless Mini Chocolate Cake Bites
One year ago: Christmas Morning Cinnamon Rolls


PUMPKIN ROLL

From Brown Eyed Baker | Yield: 8 - 10 servings | Time: 2 hours

Ingredients
For the cake:
3/4 cup all-purpose flour
1/2 teaspoon baking powder
1/2 teaspoon baking soda
1/2 teaspoon ground cinnamon
1/2 teaspoon cloves
1/4 teaspoon salt
1 cup granulated sugar
3 eggs
2/3 cup pure pumpkin puree (i.e. Libby's)

For the filling:
8 ounces cream cheese, room temp
6 tablespoons unsalted butter, room temp
1 cup powdered sugar
1 teaspoon pure vanilla extract

Powdered sugar, for sprinkling

Directions
For the cake:
Preheat oven to 375 degrees F. Grease 15 x 10 inch jelly roll pan. Line with parchment paper.

In a small bowl, whisk together the flour, baking powder, baking soda, cinnamon, cloves, and salt.

In a separate bowl, thoroughly beat sugar and eggs (2 minutes). Add pumpkin, then fold in dry ingredients. Do not over-mix. Pour into pan and smooth into an even layer. Bake for 13 - 15 minutes, until top of cake springs back when lightly pressed. Run a knife around the sides of the pan to loosen the cake.

Prepare a piece of parchment paper on the counter and sprinkle with 1/4 cup powdered sugar. Turn the cake out onto the prepared piece of parchment paper and carefully peel off the parchment paper from the top of the cake. Starting with short end, carefully roll up the cake with the parchment paper. Place rolled cake on wire rack, seam-side down, and allow to cool to room temperature.

For the filling:
Beat cream cheese and butter until smooth. Add powdered sugar, then vanilla.

Carefully unroll the cake. Spread cream cheese filling evenly over the surface of the cake. Re-roll cake. Wrap tightly in plastic wrap and refrigerate for 1 hour. When ready to serve, dust with powdered sugar. Enjoy!

Storage Note: Wrap tightly in plastic wrap or place in air-tight container and refrigerate.


Tags fall, thanksgiving, holiday
French Apple Tart | Pass the Cocoa

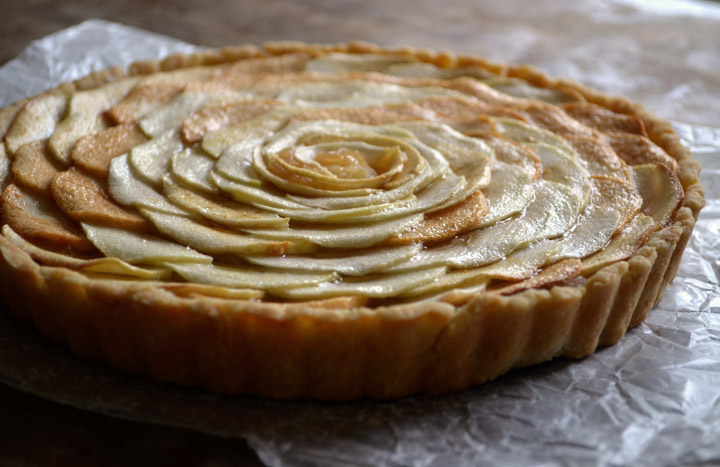
French Apple Tart

Caroline Zhang November 11, 2014

Last Friday, I finally gave in and got a big slice of caramel apple pie from a local cafe. It was welcome, if not entirely needed; it's just been one of those weeks. 

I admit I'm guilty of stress-eating sometimes. Like this week, for instance, I've gone through quite a bit of sugar (let's not even talk about the chocolate) and have been craving pie. To me, pie is one of the ultimate comfort foods. Warm, sweet, buttery. Crumbly and homely, so you don't have any qualms about just digging in with a fork.

Mid-November always brings a few weeks of extreme stress at college; I think it's the combination of the last round of papers and midterms of the semesters, the onset of final exam and final papers preparation, plus a slew of elections for most of the major student elections. It's one of those moments when it hits me that I really am at Harvard, surrounded by people who are used to having straight As and being president of all their extracirriculars. It's generally quite inspiring, but at times like this, it can all seem rather overwhelming.

French Apple Tart | Pass the Cocoa

Anyways, I'm posting this recipe for French Apple Tart that I made a couple of months ago, right before I came to school, in the last lazy days of summer. It's a lighter, more sophisticated take on American apple pie. I hesitate to use the word "light" - it implies some sort of tasteless diet food, which this is not. It simply tastes like...apple. Apple, and buttery pastry. If you're looking for an alternative to traditional Thanksgiving pie, this is it. It's sure to impress, yet surprisingly easy to make.

Give this one a try; it's definitely a keeper. It's perfect for a fancy dinner, or if you're looking for a tart without the sticky syrup of apple pie filling. Or simply because you could really do with a slice of something sweet and warm.


French Apple Tart

Click here for the printer-friendly recipe.
Yields: One 9-inch tart
Crust adapted from David Lebovitz, Filling adapted from Tartelette


Ingredients
For the crust
½ cup butter, cubed
4 teaspoons vegetable oil
¼ cup water
4 teaspoons sugar
¼ teaspoon salt
1 ⅓ cups all-purpose flour

For the Apple Compote Filling
6 medium apples, such as Gala, Golden Delicious or Honeycrisp
⅓ cup water
2 tablespoons sugar
1 teaspoon vanilla extract

For the Topping
3 medium apples
1 tablespoon lemon juice
2 tablespoons apricot jam
1 teaspoon hot water

Directions
Preheat the oven to 410 F.

Place the butter, vegetable oil, water, sugar, and salt in an oven-proof bowl. Bake in the oven for 15 - 20 minutes, until the mixture is boiling and the edges turn golden brown.
Carefully take the bowl out of the oven, and even more carefully, add the flour and mix until incorporated and it forms a soft dough. (The butter/water mixture will spit when you add the flour, so do not lean directly over it!)

Let cool for about 15 minutes. Scoop the dough into a tart pan, and let cool for another 15 minutes or so.
Meanwhile, make the apple compote. Peel and dice the apples, then place them in a medium pot with the water and sugar. Cook the apples over low heat for 45 minutes to 1 hour, until the apples have stewed down to a paste. Stir every 15 minutes or so and add some water if the mixture becomes too dry.  Stir in the vanilla and let cool until just warm.

Using your hands, shape the dough around the tart pan. Prick the bottom all over with a fork. Bake the tart at 410 degrees F for about 15 minutes, until the edges are slightly golden-brown.

Lower the temperature of the oven to 350 F. Spread the apple compote evenly over the crust.

Thinly slice the three apples for the topping. Toss the slices in lemon juice. Arrange them on top of the compote; start from the outer edge, overlapping the slices slightly, and work your way in . Bake the tart for about 20-25 minutes, or until the edges of the apple slices on top turn golden brown. 
Mix together the apricot jam and hot water, and brush over the top of the tart. Let cool until warm, then serve.


In pie Tags tart, pie, apple, thanksgiving

Search Posts

Post Archive
  • "easy"
  • "breakfast"
  • "chocolate"
  • "cookie"
  • cake
  • cookie
  • "fruit"
  • "summer"
  • "bread"
  • "Cheesecake"
  • "Oreo"
  • "dessert"
  • "fancy"
  • "Cake"
  • "blueberry"
  • pie
  • "cinnamon"
  • savory
  • breakfast
  • "berry"
  • "brownie"
  • "cupcake"
  • "holiday"
  • "nutella"
  • bars and brownies
  • "apple"
  • "birthday"
  • "pastry"
  • "pie"
  • "scone"
  • bread
  • candy
  • cheesecake
  • "banana"
  • "biscuit"
  • "citrus"
  • "ganache"
  • "lemon"
  • "macaron"
  • "muffin"
  • "strawberry"
  • "vegetable"
  • "almond"
  • "buttercream"
  • "cake mix"
  • "cranberry"
  • "cream cheese"
  • "frosting"
  • "glaze"
  • "healthy"
 

Powered by Squarespace