• About
  • Food Photography
  • Portraiture
  • Contact
Menu

Caroline Zhang Photography

  • About
  • Food Photography
  • Portraiture
  • Contact
×
Italian Jam Crostata | Pass the Cocoa

Italian Jam Crostata

Caroline Zhang September 3, 2013

Guess what? It's my first day of school! Yippee, sophomore year. And so, while Monica is enjoying one more month of summer break (lucky butt), Boston has been drilling it into me that it is most definitely not summer anymore.  It was 90 degrees when I left Indiana, and 64 degrees when the plane landed in Boston the same afternoon.

And so, instead of finishing unpacking or figuring out my classes, I'm going to talk about this crostata, which I made a few days ago, which reminds me of summer and hot, humid Italy and its vicious mosquitoes that eat you alive. Take that, Boston weather.

Italian Jam Crostata | Pass the Cocoa

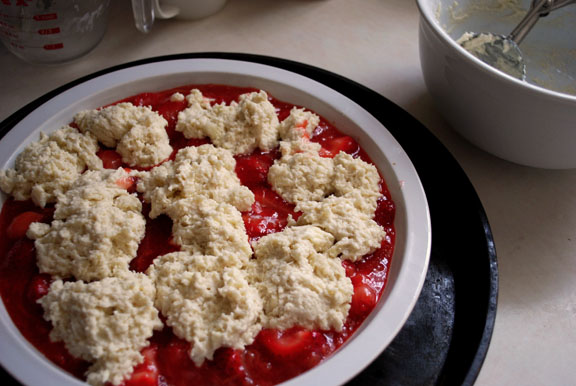
This is pretty different from the Blueberry Crostata

that Monica posted a couple of months ago. While hers was more of a pie, this is a shortbread tart filled with jam, and is more cookie-like.

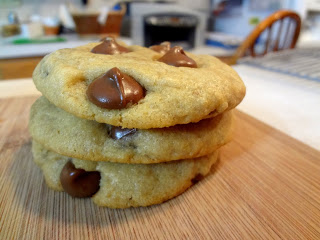
I love the beautiful simplicity of this tart that yields such a rich and delicious flavor. The jam filling is thick and sweet, but not too sweet, and goes perfectly with the buttery shortbread.

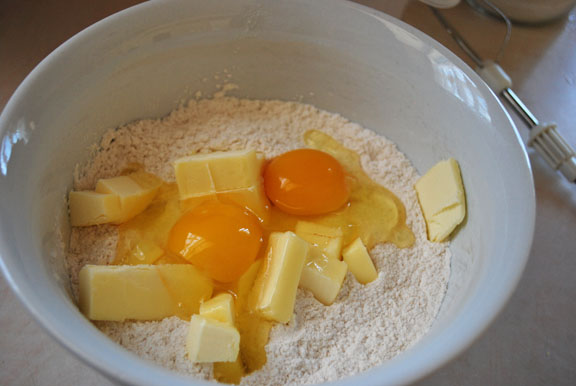
See? These are all the ingredients you need to make this crostata.

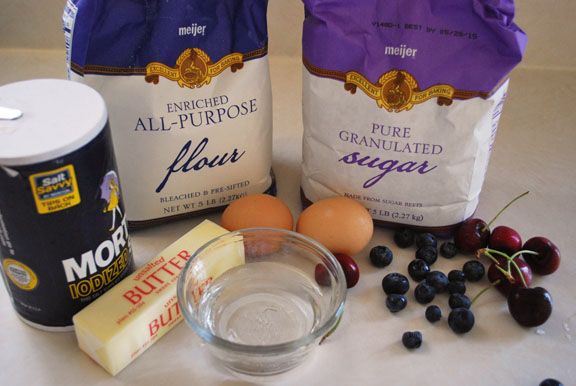
You can either use store-bought jam or make your own.  I would suggest making it yourself if you have time, so that you have more control over the sweetness. You'll be spreading a lot of jam on the tart, and the sweetness becomes more concentrated through the baking process.

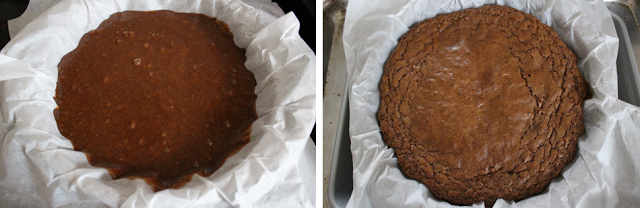
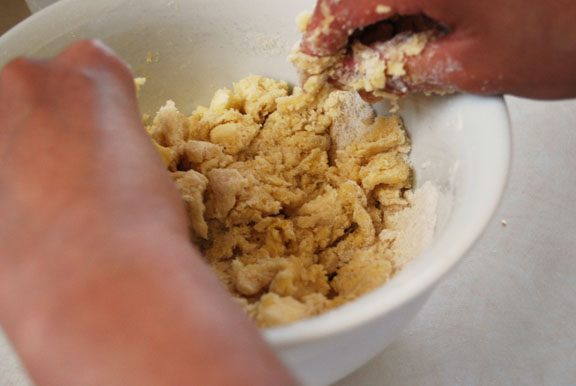
For the dough, whisk together the flour, sugar, and slat, and work in the butter and eggs with your hands, or a pastry cutter.

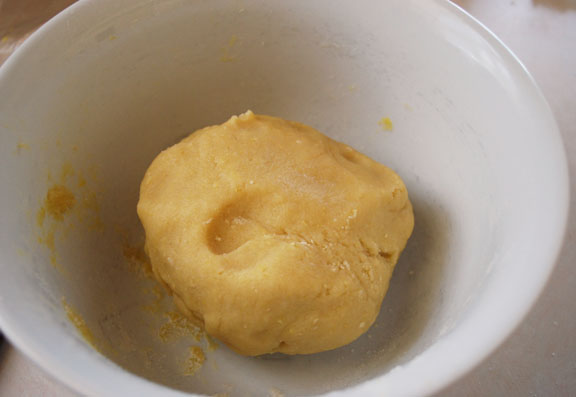
Refrigerate it for about an hour.

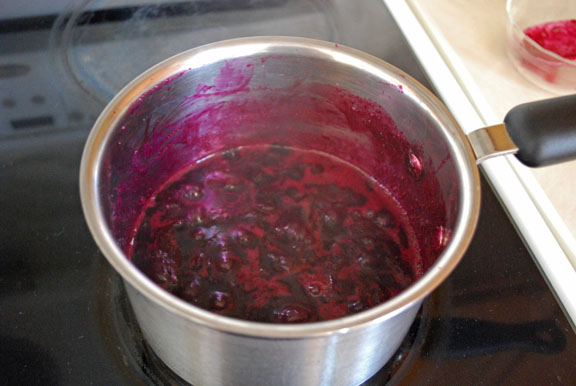
And now, make your jam! If you're using store-bought jam, I'd suggest mixing in about a tablespoon of lemon juice so that it's not too sweet. Cook your jam ingredients in a pot until it thickens.

To test for thickness, place a dollop of jam on a chilled plate and refrigerate for about 3 minutes. You should see that a think skin has formed on top that wrinkles when you touch it with your finger.

Divide your dough in half, with one half being slightly bigger, and roll out the larger half into a 10-inch circle. 

Place it onto a greased baking sheet, spread the jam on it, and roll out the rest of the dough and cut it into 3/4-inch strips.

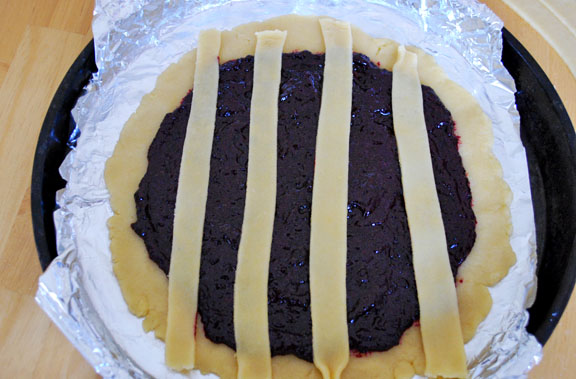
Lay four strips on the jam:

Fold back every other strip, and lay down a strip across the remaining two strips. 

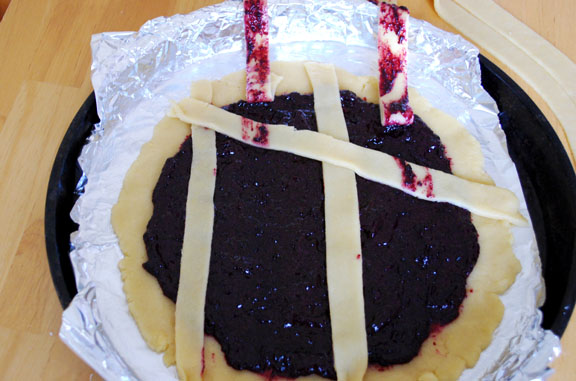
Return the two strips to their original position so that they are now lying on top of the strip you just laid down, and fold back the other two strips.

Lay down another strip.

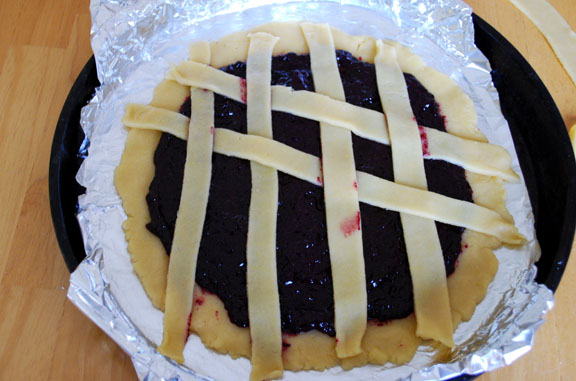
Keep on doing this until the lattice covers the whole tart...

Then roll the edges of the circle towards the center, until it touches the jam.

Bake at 350 degrees Fahrenheit for 25-35 minutes until golden brown, and enjoy!

Italian Jam Crostata | Pass the Cocoa

Enjoy, all!

-Caroline

Italian Jam Crostata

Click here for the printer-friendly recipe.
Adapted from Tuscan Recipes


Ingredients
1 ½ cups all-purpose flour
⅓ cup granulated sugar
¼ teaspoon salt
8 tablespoons butter, cold, cut into cubes
1 egg and 1 egg yolk
1 cup jam (see below for homemade jam)
1 tablespoon lemon juice

For homemade jam:
4 cups fresh fruit (such as blueberries,  pitted cherries, apricots, or peaches)
⅔ cup granulated sugar, or to taste
½ cup water
1 teaspoon lemon juice


Directions
Make the crust.  Whisk together the flour, sugar, and salt.

Add the butter, egg, and egg yolk. Using your hands or a pastry cutter, incorporate the butter and eggs into the flour to form a smooth dough. Refrigerate for an hour.

Prepare the jam. If you are using store-bought jam that is very sweet, mix in 1 tablespoon of lemon juice, since the baking process will intensify its sweetness.

If you are making the jam, place the fruit, sugar, water, and lemon juice in a large pot and bring to a boil. Boil for about 5 minutes, stirring constantly. Reduce to a simmer and cook until the jam has thickened. To check if it is thick enough, place a small spoonful onto a chilled plate and refrigerate for 3 minutes. When you push the jam with your finger, it should have formed a skin on top. Let the jam cool.

Preheat the oven to 350 degrees Fahrenheit. Assemble the crostata. Divide the dough in half, with one half slightly bigger than the other. Roll out the larger half into a 10-inch circle and place on a greased baking sheet. Spread the jam over the dough, leaving a one-inch border.

To make the lattice crust on top, roll the other half into a 10-inch circle. Using a pizza cutter or knife, cut the circle into about ¾-inch strips.

Lay four strips on top of the jam, parallel to each other and equally spaced. Fold back every other strip.

Lay another strip of dough on top of the two strips that are not folded back. Unfold the two folded strips and lay them down on top of the strip you just added. Fold back the two strips that were not folded over before, lay down another strip, and repeat until the top of the crostata is covered.

Roll the edges of the crostata towards the center, until they touch the jam. Bake the crostata for 25-35 minutes, until golden on top. Let cool until it is only warm, and serve.

In pie Tags tart, crostata, jam, Italian, blueberry, cherry, shortbread

Hershey's Brownie Cake

Monica Cheng August 29, 2013

Grab yourself a tall glass of cold milk and a scoop of vanilla ice cream. Hellooo, Hershey's Brownie Cake.

I call this Hershey's Brownie Cake because although it is technically a brownie according to the original recipe, one bite of this deliciousness reminded me of a cake-like texture.

It wasn't exactly what I expected, but hey it tastes amazing...incredibly soft, moist, and full of Hershey chocolate flavor. I bet it'd taste even better with some walnuts thrown in, for a little crunch.

Cheers for the first brownie recipe on Pass the Cocoa! ...Crazy, right? Well, better late than never (:

Love,
Monica


The nice thing about this recipe is that you totally don't need any fancy kitchen equipment. I just hand mixed all the ingredients together. Easy as cake. (Get it? Ha.)

I used a round cake pan because let's be honest, round desserts are so much cuter than the other shapes. (Okay, I couldn't find a square pan.)

I took mine out of the oven just before 35 minutes, and these brownies were perfectly ready. Thank goodness I didn't bake for more!

I thought I'd chop off the round corners to make a giant brownie square. White drizzle on top is also fun and pretty.

Hershey's Brownie Cake

Incredibly soft, moist, and full of Hershey chocolate flavor.

Adapted from My Baking Addiction, originally from "The Perfect Recipe" by Pamela Anderson
Time: 1 hour
Yield: 12 servings

Ingredients

6 ounces chocolate (I used Hershey's)

1/2 cup (1 stick) unsalted butter

1 cup granulated sugar

Splash of vanilla extract

3 eggs

2/3 cup all-purpose flour

Pinch of salt

1/2 teaspoon baking powder

3/4 cup walnuts, pecans, macademias, peanuts (optional)

Directions

Preheat oven to 325 degrees F.

Using a microwave, melt the chocolate and butter in 10-second increments, stirring in between each interval until completely smooth. Watch carefully to avoid burning the mixture.

Combine the melted chocolate butter mixture with sugar and vanilla. Then add eggs one at a time, fully incorporating each before adding the next.

Add flour, salt, and baking powder. Then stir in nuts (if desired). If using a stand mixer or electric mixer, be sure not to over mix.

Bake at 325 degrees F for 35 - 45 minutes. Toothpick inserted through middle should come out with fudgy crumbs. Cool, serve, & enjoy!

Storage Note: Wrap in plastic wrap and then foil and refrigerate for up to 5 days.

In "Cake", "brownie", "chocolate", "classic", "easy", "hershey", "quick"
Strawberry Rhubarb Cobbler | Pass the Cocoa

Strawberry Rhubarb Cobbler

Caroline Zhang August 19, 2013

This is the first time I've ever used rhubarb in a recipe; I've never even heard of this weird pink celery thing until maybe two years ago. I'm not entirely sure how I feel about it...I took a bite of the raw rhubarb and I swear the acid nearly burned a hole in my tongue, it was so sour. The stupid vegetable almost got itself kicked out of the recipe after that episode. But it did give me this beautiful cobbler, so I guess everything is all right between rhubarb and me.

Strawberry Rhubarb Cobbler | Pass the Cocoa

Even if you're not a fan of rhubarb, you should make this. The biscuit topping is soft and fluffy, and the sugar on top caramelizes in the oven and gives it a slight crispness. The filling is tart and fruity, and the rhubarb and strawberries nicely compliment each other. 

Start by cutting off the ends of your rhubarb stalks and cutting it into one-inch pieces.

Rhubarb

If you put any of this in your mouth, don't say I didn't warn you.

Hull and slice your strawberries in half. If they're really big, you might need to quarter them.

Hulled Strawberries

Put the rhubarb, strawberries, water, and sugar in a saucepan and cook over medium heat until the fruit (or fruit and vegetables technically I guess) have released their juices and create a thick sauce.

Pour the filling into a greased pie plate or 8x8 baking pan and set it aside.

Now, make the topping. Mix together the flour, sugar, salt, and baking powder. Add the cubed butter and use your fingers a pastry cutter to work the butter into the flour mixture, until the butter pieces are about the size of small peas.

Add the butter milk and mix until the dough barely comes together. Don't over-mix!

Use an ice cream maker to scoop golf ball-sized pieces of dough on top of the filling. Or you could use your hands...why wash more baking utensils than you have to?

Now sprinkle some sugar on top and pop it into the oven!

Strawberry Rhubarb Cobbler | Pass the Cocoa

Hello Beautiful.

I know I've been posting a bunch of pastries lately--cute, but complicated. This cobbler is a nice change of pace; it is so wonderfully simple and delicious, and is the perfect summer dessert, served warm from the oven with a big scoop of vanilla ice cream.

Enjoy everyone!

-Caroline


Strawberry Rhubarb Cobbler

Click here for the printer-friendly recipe.
Adapted from Girl Versus Dough
Yields: one 8- or 9-inch cobbler

Ingredients
For the Filling:
2 cups rhubarb, cut into 1-inch pieces
2 cups strawberries, hulled and cut in half
¾ cup granulated sugar
2 tablespoons water
2 tablespoons cornstarch
¼ teaspoon vanilla extract

For the Topping:
1 cup flour
½ teaspoon salt
2 tablespoons granulated sugar, divided
2 teaspoons baking powder
4 tablespoons butter, cold
½ cup buttermilk, cold

Directions
Preheat the oven to 400 Fahrenheit.

Make the filling. Place the rhubarb, strawberries, sugar, water, and cornstarch in a pot over medium heat, and cook until the strawberries and rhubarb are soft, and their juices become a thick sauce. 

Take the mixture off the heat, stir in the vanilla extract, and pour into a greased 8 x 8 inch baking pan or pie plate.

Make the biscuit topping. Whisk together the flour, salt, 1 tablespoon sugar, and baking powder.

Cut the butter into ½-inch cubes and add it to the flour. With a pastry cutter or using your hands, work the butter into the flour, until the mixture resembles coarse crumbs.
Add the buttermilk, and mix until the dough just comes together. Do not overmix. Scoop golf ball-sized pieces of dough over the filling. 

Sprinkle the remaining 1 tablespoon of granulated sugar over the biscuits.

Bake the cobbler for 40 minutes, or until the biscuits are golden brown. Let cool until just warm, and serve.

In pie Tags cobbler, fruit, berry, rhubarb, summer, easy

Thick & Chewy Chocolate Chip Cookies

Monica Cheng August 12, 2013

So, let's talk cookies. But not just any ol' cookie. In our entire cookie history, we've had

lemon cookies

,

nutella-filled snickerdoodles

,

classic snickerdoodles

,

piñata cookies

and even

pirouette cookies

(fancy that!). But not once have we made the classic chocolate chip cookie. For shame!

But luckily, I made some the other day. And not just one batch. I've made these cookies at least two or three times and they were deliiiiicious every time!

Nora

, from

Buttercream Fanatic

, really got it right when she named these cookies the perfect thick & chewy chocolate chip cookie. The only adjective I'd add on is "soft." These cookies sure are soft, thanks to the cornstarch! Yummy.

This is Nora's original recipe for her favorite chocolate cookie, and I have to say that it is my very first favorite homemade cookie.

Maybe one day I'll develop my own one-of-a-kind chocolate chip cookie that I can hand down to my children and grandchildren. I think that'd be pretty cool. I'd be the great origin of all great & timeless recipes in the future Cheng dynasty. Just kidding. I don't think there was ever really a great Cheng dynasty in China's history to begin with...

But you know, my parents could have at least let me inherit a good

red bean moon cake recipe

. I consider that a type of cookie as well. I could eat those by the truckload, shipped (er, flown?) straight from the motherland. But alas, no such luck. I guess I'll have to go exploring for that recipe myself as well!

But I digress.

Chocolate chip cookies are the best and most classic dessert of all. First of all, the cookie dough is finger-licking delicious. Second, it's got yummy chocolate chips. Third...well, it's a chocolate chip cookie! What's there not to like? I shouldn't even have to explain myself.

One last thing I simply

must

mention (if you're still reading) before handing you the recipe. I'm especially excited about this post because this is my first time using my brand new darling beautiful Canon Rebel EOS SL1. My first DSLR! Can you tell the quality change in photography in this post? I'm in a land of happiness and joy, with butterflies fluttering around in the clear blue skies...while I obsessively take photos of every pretty thing I see.

Ahem.

Take a look at the difference in quality of photos. Exhibit A. My Sony point and shoot camera. I slaved away at this photo, and this was the best I could get. Granted, it was taken at night, so it wasn't the most ideal time of day...And all that background clutter. *shudder*

Exhibit B. New DSLR-quality photo. I can't believe I've been deprived of this amazing upgrade for this long.

Okay, enough of my ramblings. Enjoy the cookie!

Cheers,

Monica

*

Heads up. I made the full recipe the first couple of times previously with success. The photos you see below reflects the halved recipe, which works just as beautifully.

Cream the butter and sugar until light and fluffy. Literally, do you see that mixing paddle there? That batter definitely rates high on the fluffy chart.

Now you add the egg and vanilla. Then the flour all at once. Mix slowly, careful not to over mix. You get the final mixture on the bottom left. Then add chocolate chips, the best part! I just use my hands to scoop out 2 large handfuls of chocolate chips directly from the bag. It's all approximate, the way I see it. You want more? Add more. If not, add less. Though I can't see why anyone would choose the latter.

Now plop the cookie dough onto the baking sheet. I decided I just wanted one cookie that day.

Just kidding. What kind of person would make just a single cookie? I made two cookies!

Call me crazy. But I think the beauty of this cookie recipe -- all cookie recipes, in fact -- is that you can freeze the raw cookie dough for days. That way, you just bake the amount you feel like eating that day and then save the rest for later! Fresh cookies all the time. That's the kind of life I want.

Click here for printable recipe of Thick & Chewy Chocolate Chip Cookies

.

Thick & Chewy Chocolate Chip Cookies

From

Buttercream Fanatic

Yield: 15 - 20 cookies

Time: 20 minutes + 3 hours to chill

Ingredients

1 cup (2 sticks) unsalted butter, softened to room temperature

1 cup brown sugar

1/4 cup granulated sugar

1 large egg plus 1 egg yolk, preferably room temperature

2 teaspoons vanilla extract

Pinch of salt

1 1/4 teaspoon baking soda

2 teaspoons cornstarch

2 1/4 cups all-purpose flour

1 cup (or, up to 1 3/4 cup) chocolate chips

Coarse salt for sprinkling (optional)

Directions

1. Cream together softened butter, brown sugar, and granulated sugar on medium-high speed for 3 - 5 minutes until light and fluffy.

2. Add eggs and vanilla extract and continue to mix on medium speed for about a minute until the consistency is even throughout.

3. Add baking soda and mix for about 20 seconds. Then add salt and cornstarch, mixing again for another 20 seconds. Now add all of the flour at once. Slowly mix the flour in until 

just

 combined. Do not over-mix. Fold in chocolate chips.

4. Roll the dough into approximately 2 - 3 inch balls. Flatten slightly into thick discs and sprinkle with coarse salt. Lay the dough discs on a plate and refrigerate for at least 3 hours, ideally overnight. If you're really in a hurry, you can freeze them for an hour.

5. Preheat the oven to 350 degrees F. Spread the dough discs on a cookie sheet lined with parchment paper. Bake for 11 - 12 minutes, or until the edges are just barely golden. Cool for 10 minutes. Serve & enjoy!

Storage Note

: Store in an airtight container for up to 3 days, or freeze for up to 3 months.

In "chip", "chocolate", "cookie", "cornstarch"
← NewerOlder →

Search Posts

Post Archive
  • "easy"
  • "breakfast"
  • "chocolate"
  • "cookie"
  • cake
  • cookie
  • "fruit"
  • "summer"
  • "bread"
  • "Cheesecake"
  • "Oreo"
  • "dessert"
  • "fancy"
  • "Cake"
  • "blueberry"
  • pie
  • "cinnamon"
  • savory
  • breakfast
  • "berry"
  • "brownie"
  • "cupcake"
  • "holiday"
  • "nutella"
  • bars and brownies
  • "apple"
  • "birthday"
  • "pastry"
  • "pie"
  • "scone"
  • bread
  • candy
  • cheesecake
  • "banana"
  • "biscuit"
  • "citrus"
  • "ganache"
  • "lemon"
  • "macaron"
  • "muffin"
  • "strawberry"
  • "vegetable"
  • "almond"
  • "buttercream"
  • "cake mix"
  • "cranberry"
  • "cream cheese"
  • "frosting"
  • "glaze"
  • "healthy"
 

Powered by Squarespace