• About
  • Food Photography
  • Portraiture
  • Contact
Menu

Caroline Zhang Photography

  • About
  • Food Photography
  • Portraiture
  • Contact
×

Candied Sesame Peanuts

Caroline Zhang December 30, 2013

Oh heyyyyy.... Sorry for the disappearance from the blogosphere these past weeks. Monica and I both got caught up in final exams/packing/traveling/holiday festivities/explaining to the parents what a history and literature major is and why anyone would want one. Oh wait, that last bit might just be me. Anyways, we have a super awesome recipe for you today to make it up to you!

Still looking for an easy and delicious treat to serve at a get-together? These caramelized sesame-coated peanuts are sure to be a hit. I've been meaning to post these for some time, but somehow they all manage to disappear before I managed to take pictures.

You can make these guys in 15 minutes flat, and the hardest part is definitely waiting long enough for them to cool. They involve melting sugar, but don't worry, there is no candy thermometer or anything involved, and it is pretty hard to mess up. You just throw the sugar, water, and raw peanuts in a large skillet, and cook them over medium heat until the the sugar melts and the peanuts are roasted, and then sprinkle on sesame seeds and some salt. See? The recipe can be summed up in a sentence. And then you end up with these sweet, crunchy, caramelized treats.

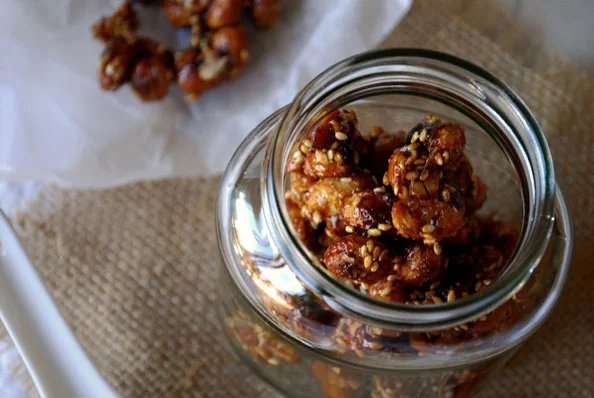
Don't worry if there's still a couple of bits of uncooked sugar left on the peanuts. You don't want to leave them on  the stove too long or the peanuts will begin to burn. These are perfect appetizer to serve at parties, but are also great just as an everyday snack.

Give these a try, and make these today! And tomorrow! And the day after that!

Happy New Year, guys!

-Caroline

Candied Sesame Peanuts

Click here for the printer-friendly version of the recipe.
Yields: 2 cups candied Peanuts | Adapted from David Lebovitz


Ingredients
2 cups raw peanuts
1 cup granulated sugar
⅓ cup water
½ teaspoon sea salt (see notes)
¼ cup sesame seeds

Notes: If you don’t have sea salt, you can substitute it for ⅛ teaspoon table salt. Just make sure to evenly sprinkle the salt over the peanuts and to mix very well.


Directions
Mix together the water, sugar, and peanuts in a large skillet over medium heat until the sugar is dissolved.

Continue cooking the peanuts, stirring occasionally. The sugar will crystallize and will appear white and crusty.

The sugar will begin to melt and turn into a golden brown syrup. Still the peanuts around in the skillet so they are evenly coated in the syrup. Occasionally take the skillet off the stove for a few seconds while mixing to avoid burning the peanuts.

Once most of the sugar has melted take the skill off the heat and sprinkle the salt and sesame seeds over the peanuts. Mix so the peanuts are evenly coated.

Let cool and serve!

In candy Tags nuts, caramel, candy, easy, sesame

Christmas Morning Cinnamon Rolls

Caroline Zhang December 16, 2013

With Christmas just a week away, do you have a special breakfast planned for this most wonderful time of year? Leave it to Nora of  Buttercream Fanatic to come up with the perfect way to start Christmas day. It's crunch time for us college students for finals, and we are so, so excited/happy/honored that Nora agreed to write a guest post for us. Nora is an incredibly sweet, talented, and witty woman who not only juggles her work and studies but also is able to find the time in between to indulge her sweet tooth with delicious baked goods (like Hazelnut Pumpkin Pie and Better-Than-Starbucks Cinnamon Scones). And we'll now leave this post in Nora's capable hands to show us how to make these awesome cinnamon rolls. - Monica and Caroline.

Happy holidays, Pass the Cocoa readers! My name is Nora, and I'm usually waxing poetic about something sugary or other over at

Buttercream Fanatic, which you may know as the place where you saw this mouth watering cheesecake that Monica and Caroline were generous enough to let me share while I was on vacation earlier this year. So you'd better believe I jumped at the chance to return the favor, especially if it means giving these two hard-working ladies some time to enjoy their winter break! I still can't believe they are full time students and still find time to cook, photograph and share such gorgeous baked creations. Talk about talent!

When they asked me to guest post around the holidays, of course my mind went to Christmas cookies, the obvious choice for this time of year. But I'm starting to realize that many people have their own tried-and-true recipes for their favorite cookies that they turn to every year, and those who don't have eleventy billion other bloggers, Food Network chefs, and Pinterest pinners to help them out. But you know what gets overlooked in all of the Christmas cookie chaos? Breakfast. Yes, that's right, the humble, and completely underrated Christmas breakfast. Um hello, where do you think you get the energy to tear open all that wrapping paper?? Respect the breakfast, guys.

Now, Christmas breakfast is a tricky one because you need something decadent and carb-y and sweet (because A. it's breakfast on a special occasion and B. if your family is like mine, all you really want for breakfast is cookies anyway), not to mention festive (see: tree, etc), but you also don't want something that will in any way show up the elaborate lunch or dinner that you and your family have been or will be probably slaving over for hours, if not days.

Enter: the cinnamon roll. Sweet, carby comfort food? Check. Festive? Check, because I added sprinkles. Won't upstage? Double check. Cinnamon rolls, at least of the homemade persuasion, are time-consuming enough that my guess is you don't eat them every day. But they are still not so outrageous as to take the focus away from the tree, what's under it, or the special meal later in the day. It's a perfect match.

This recipe makes enough for a crowd (3 pans!), so for those of you who host friends or extended family for the holidays, never fear: no one will go hungry. If you aren't the host, these will work great for you too as they travel quite well.

The recipe calls for two different types of fillings. First there is the traditional cinnamon-sugar combination that really makes a cinnamon roll a cinnamon roll. Second, there is a fig and orange filling for the adults but, honestly, everyone who has tried these preferred the cinnamon filling regardless of their age, so if you are a fan of the classics, feel free to omit the fig and orange flavor, double the cinnamon-sugar recipe, and just make cinnamon rolls. I like the idea of having a slightly more sophisticated flavor option for the adults, and the classic cinnamon sugar for the kids, which is why I offered both.

So that's the good news. The bad (well, less convenient) news is that cinnamon rolls are a form of yeast bread, and yeast is scary, right?

Wrong

. I sympathize. Really, I do, as I used to be on the yeast-is-terrifying bandwagon right there with you. As long as you have unexpired yeast, you proof it properly, and you provide it good rising conditions, you'll be fine. In plain English this means:

  • Check the expiration date of your yeast to make sure you are well within range. If you have any doubts, buy a new package. Also, it is best to keep your yeast in the fridge or freezer. Technically, this only applies to opened packages, but I always just pop the envelopes in the fridge as soon as I get home from the grocery store. As a bonus, it helps you remember where you put them! But any cool, dry storage place will do for unopened packages.
  • Follow the proofing instructions in the recipe exactly. You need all three ingredients - the yeast, the water at a very warm, but not boiling hot temperature, and the sugar - to "wake up" the yeast properly. The original recipe doesn't call for proofing the yeast, but I always do it as a precaution. I'd rather spend that extra one minute of prep time, and then let the yeast proof while I'm assembling the other ingredients, than risk the dough not rising properly.
  • When your yeast is rising, act like a baby is sleeping. No, loud noises won't affect your dough, but the actions associated with them will. That means try not to slam the oven door, drop stuff on the counter above or nearby, or run or jump near the oven. I know it sounds excessive, but the yeast is really doing hard work rising the bread. It's basically defying the laws of gravity if you think about it!* Not jostling or disturbing it allows it the best environment in which to do its work. And don't forget, opening the oven door before the yeast is risen is no good either. The yeast needs peace, quiet and warmth to turn into a beautiful risen butterfly, and opening the oven will let out the warm air. 

*slight exaggeration

The bottom line is this: Working with yeast is totally doable, so try not to let yourself be afraid of the yeast, or the effort involved in this recipe. It's well worth it: a full belly and satisfied taste buds make opening gifts even more fun!

Happy holidays, everyone!

Christmas Morning Cinnamon Rolls

From Buttercream Fanatic, adapted from Smitten Kitchen


Ingredients
For the dough:
1 package (about 2 1/4 teaspoons) active dry yeast
1/2 cup + 1 teaspoon granulated (white) sugar
1/4 cup very warm water + more for boiling
3/4 cup whole milk
3 Tablespoons unsalted butter
3 1/2 cups unbleached all purpose flour, plus more for kneading and dusting the cutting board
1 large egg
1 teaspoon salt
nonstick vegetable oil spray

For the filling:
3 Tablespoons unsalted butter, melted
1 cup granulated sugar
1/3 cup cinnamon (more to taste)
3/4 -1 cup fig preserves
zest of 1 large orange (about 2 Tablespoons, loosely packed)

For the glaze:
1 cup confectioner's (powdered) sugar
1 1/2 Tablespoons milk

Preheat the oven to warm. In a small pot, bring about 2" of water to a boil. No need to be scientific with the amount of water here. This is going to be steam heat to help the dough rise.

In a small bowl, quickly mix the yeast and 1 teaspoon sugar. Immediately add the 1/4 cup warm water and gently stir once or twice to moisten all of the yeast granules. Set aside, and don't touch! After 5 minutes, the yeast should have come alive and started to froth and foam.

While the yeast is waking up, combine the milk and butter and microwave 30-45 seconds, just until the butter is melted. Set it aside for a second. Add the dry ingredients (flour, remaining sugar, salt) to the bowl of an electric mixer fitted with the paddle attachment and mix a few times to blend. Add the egg, butter/milk mixture (which should now be warm to the touch, but not hot), and yeast slurry. Mix to blend moist ingredients evenly throughout the wet ingredients, and then switch to the hook (kneading) attachment. The dough may be quite sticky. If this is the case, add flour, 1 Tablespoon at a time, until the dough forms a ball.

Generously coat a large mixing bowl (glass is preferable, but plastic or metal is ok too) with nonstick cooking spray and turn the dough ball into it. Cover with a piece of plastic wrap directly on the dough, but do not adhere the cooking wrap to the sides of the bowl so that it will not impede the rising process. Turn off the preheated oven, and immediately place the covered dough in its bowl on the top rack. Put the pot of boiling water, uncovered, on the lower shelf of the oven. Quickly close the oven door, and do not open again for 2-3 hours.

After the first rise is over, carefully remove the dough (and the pot of water) from the oven and use a sharp knife to cut it in half. The dough will deflate dramatically, but that's ok. Grease 3 8x8" baking dishes or 9" pie plates and preheat the oven to warm. Turn one half of the dough onto a liberally floured cutting board, and roll it out into a fat rectangle (fat meaning the shorter side is not too much shorter than the longer side), long side perpendicular to you. It should be approximately a quarter inch thick. Spread the fig preserves in an even layer, and evenly sprinkle the orange zest on top of it. Bring the fillings to about 1/4" from the edges.

Starting at the side furthest away from you, gently roll the dough into itself, keeping the roll relatively tight, until it is completely rolled in a long log. Use a sharp knife to cut into 3" slices, discarding the ends. Divide pieces evenly between prepared baking dishes (6 per dish), leaving room around each roll to expand. Now mix the cinnamon and sugar in a small bowl and repeat the process with the other half of the dough: roll out, slather evenly with melted butter, sprinkle on the cinnamon-sugar mix, roll and slice. Arrange in the other baking dish, leaving space around each one.

Put the baking dishes in the preheated oven and immediately turn the oven off. Allow to rise for 45 minutes to an hour. Once the second rise is complete, remove the dishes from the oven, preheat to 375F, and bake for 15-17 minutes or until tops are golden. Allow to cool slightly while you are making the glaze, which you can do quite easily by vigorously mixing together the sugar and milk until smooth. This will take some time, as the sugar will not dissolve immediately. Resist the urge to add more milk! Just keep stirring. The finished product will be a thick, viscous texture which will allow it to stick to the rolls in the ooey, gooey way that cinnamon roll frosting should. If you use more milk, it becomes so thin that it will slide right off.

The sooner these are eaten, the better. If you must store them, do so in an airtight container, unglazed, and a room temperature for 1-2 days. Note that they dry out easily, so you may want to warm them in the microwave next to a small bowl of water. Glaze immediately before serving. Makes 18 rolls.


In bread, breakfast Tags sweet rolls, yeast, guest post, christmas, holiday, breakfast

Perfect Couple Chocolate Chip Cookies

Monica Cheng December 9, 2013

December is a time for cookies. Lots of cookies. To eat, to share, to enjoy, to feast, to celebrate.

But what if an occasion rises in which you would like to make just enough cookies for one serving, fresh from the oven? That's when these Perfect Couple Chocolate Chip Cookies come into the picture.

There's something magical about the classic, simple combination of sugar, butter, flour, and chocolate chips. When I ever have a meh kind of day, I can always count on cookies to be there for me. I just love that cookies are so versatile, great for all occasions and in all forms -- cookie cake, cookie cup, classic cookie...and of course cookie dough eaten raw.

It's funny to think that I used to find the mere thought of eating raw cookie dough revolting (I think it's because my mom infused the idea of "raw cookie dough" = salmonella into me since I was little. She had the best intentions.).

But that all changed when I made friends with a cookie dough fanatic. One day while we were making cookies, a chunk of cookie dough went rogue and landed on the kitchen floor, and to my horror, my friend plucked the raw cookie dough from the floor and then happily ate it -- without even examining it for contamination! In her self-defense, my friend claims that the kitchen floor is clean because it is after all her house. To this day, though, I still question her decision. But at least now, I don't have an aversion to eating raw cookie dough. See? I've made progress.

Two extra large cookies with crisp, chewy edges and soft pillow-y centers. Always fresh out of the oven. Share it with a friend, a sibling, or loved one...Or eat them both yourself.

Enjoy!

Monica

*

Click here for printable recipe of Perfect Couple Chocolate Chip Cookies

.

Perfect Couple Chocolate Chip Cookies

From

No. 2 Pencil

Yield: 2 cookies

Time: 15 - 20 minutes

Ingredients

2 tablespoons butter,

completely 

softened to room temperature

2 tablespoons brown sugar

1 tablespoon granulated sugar

Pinch of salt

1/4 teaspoon vanilla extract

1 egg yolk

1/4 teaspoon baking soda

1/4 cup of all-purpose flour

3 tablespoons

good-quality

semisweet chocolate chips

Directions

Preheat oven to 350 degrees F and line a baking sheet with parchment paper.

Combine softened butter, brown sugar, granulated sugar, salt, and vanilla. Then add egg yolk.

Add baking soda and flour and stir until combined. Then stir in chocolate chips.

Form cookie dough into two balls and place on baking sheet, several inches apart to allow space to spread. Bake at 350 degrees F for 6 - 8 minutes, or until edges are golden brown.

Remove baking sheet from oven and give the baking sheet a firm, but careful bang on the counter top. This will deflate the cookie and give it a perfect wrinkly appearance. Enjoy while it’s still hot and fresh!

In "chocolate chip", "cookie", "single serving"

Rosemary Lemon Buttermilk Scones

Caroline Zhang December 3, 2013

It was really cold in Boston last week, and I didn't want to go out and buy yogurt. 

I baked these last week, right before I went home for Thanksgiving. I was worried that the half dozen lemons I had sitting in the fridge would go bad while I was gone (this concern for whatever reason did not extend to the eggs that had been hanging out in there for the past four weeks). I considered making a lemon yogurt pound cake--but I didn't have yogurt, and acquiring some would mean a 10-minute trek in the cold to the CVS in Harvard Square. 

So I made scones. And no, I didn't use the month-old eggs.

This is a lightly-adapted version of my master scone recipe, only I swapped out the cream for buttermilk. I've never used it before until this month, and I really suggest you give it try in your baking. You can easily substitute milk with some vinegar added, but buttermilk has a unique flavor that's hard to replicate.

I also changed the amount of  liquid in the dough from 2/3 cup to 1/2 - 2/3 cup, depending on how dry the dough is due. I usually need 2/3 cups, possibly because our heater in the dorm is set to Sahara Desert (which is one of two thermostat settings, the other being Broken.)

Enjoy, all!

Caroline

Rosemary Lemon Scones

Click here for the printable recipe.
A Pass the Cocoa Original Recipe, Flavor inspired by The Pioneer Women
Yields: 12 Scones


Ingredients:
Dough
2 cups flour
1 tablespoon baking powder
½ teaspoon salt
3 tablespoons granulated sugar
8 tablespoons butter, cold
½ to ⅔ cup buttermilk, cold
1 egg
1 tablespoon fresh rosemary, minced (or 1 teaspoon dried rosemary)
1 tablespoon lemon zest

Lemon Rosemary Glaze:
1 cup powdered sugar
3 tablespoons lemon juice, freshly squeezed
1 tablespoon fresh rosemary, minced (or 1 teaspoon dried rosemary)
1 tablespoon lemon zest


Directions:
Preheat the oven to 375 degrees Fahrenheit.

Whisk together ½ cup buttermilk, the egg, rosemary, and lemon zest. Place in the refrigerator and let sit for 15- 30 minutes.

In a separate bowl, sift together the flour, baking powder, salt, and sugar.

Cut the butter into ½-inch cubes. Make sure it remains cold. Add the butter to the dry ingredients.

Using a pastry cutter, a fork, or your hands, cut the butter into the flour. It’s okay if a few lumps remain. Work quickly so that the butter doesn't melt.

Pour the wet ingredients into the dry ingredients. Use a fork or wooden spoon to mix it until the dry ingredients are moistened and the dough barely holds together. DO NOT OVER-MIX. If the dough is too dry, add in the remaining buttermilk a little bit at a time.

Turn the dough onto a floured surface. Shape the dough into a circle 10 inches in diameter. Cut the circle into 10 - 12 wedges.

Place the scones onto a greased baking sheet and bake for 15-18 minutes, until golden. Let cool.

For the glaze, mix together the lemon juice, zest, and rosemary. Let sit for 10 - 15 minutes. Mix in the powdered sugar. Drizzle the glaze over the scones.

In muffins and scones, breakfast Tags scone, biscuit, lemon, rosemary, easy, breakfast
← NewerOlder →

Search Posts

Post Archive
  • "easy"
  • "breakfast"
  • "chocolate"
  • "cookie"
  • cake
  • cookie
  • "fruit"
  • "summer"
  • "bread"
  • "Cheesecake"
  • "Oreo"
  • "dessert"
  • "fancy"
  • "Cake"
  • "blueberry"
  • pie
  • "cinnamon"
  • savory
  • breakfast
  • "berry"
  • "brownie"
  • "cupcake"
  • "holiday"
  • "nutella"
  • bars and brownies
  • "apple"
  • "birthday"
  • "pastry"
  • "pie"
  • "scone"
  • bread
  • candy
  • cheesecake
  • "banana"
  • "biscuit"
  • "citrus"
  • "ganache"
  • "lemon"
  • "macaron"
  • "muffin"
  • "strawberry"
  • "vegetable"
  • "almond"
  • "buttercream"
  • "cake mix"
  • "cranberry"
  • "cream cheese"
  • "frosting"
  • "glaze"
  • "healthy"
 

Powered by Squarespace