• About
  • Food Photography
  • Portraiture
  • Contact
Menu

Caroline Zhang Photography

  • About
  • Food Photography
  • Portraiture
  • Contact
×
Chunky Monkey Ice Cream Cake | Pass the Cocoa

Chunky Monkey Ice Cream Cake

Caroline Zhang December 29, 2014
Chunky Monkey Ice Cream Cake | Pass the Cocoa

My brother and I were both born in the middle of winter, but we've long had a strange tradition of ordering ice cream cakes for our birthdays. I have a lot of fond memories of picking out ice cream flavors for my cake at near-empty shops as it snowed outside. (The local Maggie Moo's used to offer free scoops if more than an inch of snow had fallen.)

I've come to associate celebrations with not just cake, but specifically ice cream cake. It's not decadent if there's no ice cream.

I tried my hand at making an ice cream cake at home this year. It wasn't terribly hard, just fussy and requiring frequent trips to and from the freezer. The trickiest part was working quickly enough to keep everything from turning into a melty puddle.

I definitely recommend giving this one a try. Yes, now, in the middle of winter. There's something about making your on ice cream cake that makes you feel so accomplished. Maybe it's just from frantically shoving the cake into the freezer as cream begins to ooze down the sides.

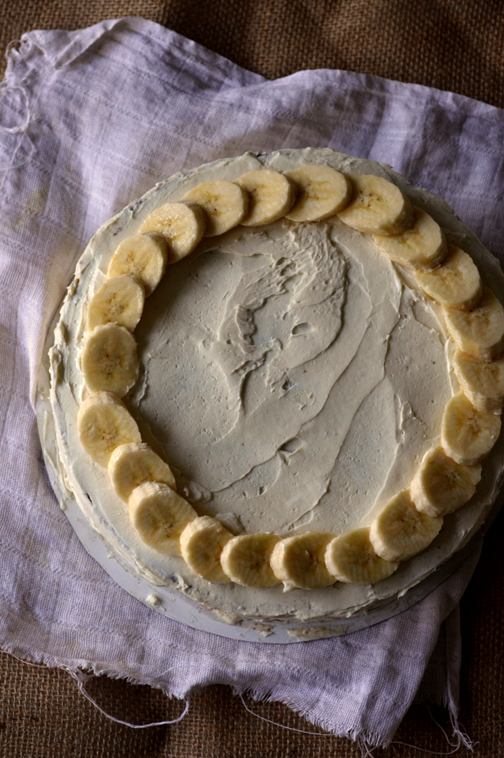
The flavors of this cake is inspired by one of my brother's favorite ice cream flavors from Ben and Jerry's, Chunky Monkey, featuring banana ice cream, walnuts, and chocolate chunks.

Chunky Monkey Ice Cream Cake | Pass the Cocoa

You can, of course, swap in whatever ice cream flavors and add ins you want. A few notes, though, on ice cream cakes:

  • The frosting: You'll need something that won't freeze solid, so don't use buttercream or whipped cream. Cream cheese works well, as does (forgive me for saying this) Cool Whip. Whatever fake milk thingy is in that stuff keeps it nice and fluffy even in the freezer.
  • The cake layers: I've included makes a fairly thin cake (I've always liked a higher proportion of ice cream to cake), so it's a little hard to slice into layers. Here's a great tutorial on how to get even layers (unlike mine). You could also cut it into two layers instead of three, so that your top layer will be ice cream instead of cake. 
  • The ice cream: you'll have an easier time spreading and slicing the ice cream if you use an airier one (or, in technical terms, an ice cream with higher overrun. Read all about that here.), such as Breyer's. Since Breyer's has some three times the air pumped into it than something like Haagen Dazs, it make the final cake much easier to slice through. But by all means, break out the premium ice cream if you'd like, you may just need to let it thaw a little bit before you spread it on the cake.

Good luck, and enjoy!
-Caroline


Chunky Monkey Ice Cream Cake

Yields: one 9-inch cake
Cake adapted from Smitten Kitchen
Click here for the printable recipe

Ingredients
For the Cake
1 cup all-purpose flour
½ cup cocoa powder
2 ½ teaspoons baking powder
½ teaspoon salt
2 eggs
½ cup vegetable oil*
¾ brown sugar
1 teaspoon vanilla extract
3 medium bananas, very ripe, smashed
½ cup whole milk

For the Ice Cream
½ gallon vanilla ice cream**
1 medium banana, very ripe, mashed
¼ cup mini chocolate chips
½ cup walnuts, toasted and chopped

For Assembly
8 ounces cream cheese, room temperature
½ cup powdered sugar
1 teaspoon vanilla extract
1 medium banana, sliced


Notes
*Don’t use butter here. It’ll make the cake very hard when you freeze it.
**I’d recommend Breyers. It’s airier than most, so it’s easy to scoop, spread, and slice.

Directions
Read the entire recipe before getting started. But actually.

Make the chocolate cake. Preheat the oven to 350 F. Whisk together the flour, cocoa powder, baking powder, and salt. Set aside. In a separate bowl, whisk together the eggs and sugar until well-combined. Whisk in the oil, vanilla, and mashed bananas. Whisk in the milk.

Fold the dry ingredients into the wet until just combined. Pour the batter into a greased 9-inch springform cake pan. Bake for 25-30 minutes, or until a toothpick inserted into the center of the cake comes out clean.

Let the cake cool completely, then refrigerate for several hours, or overnight.
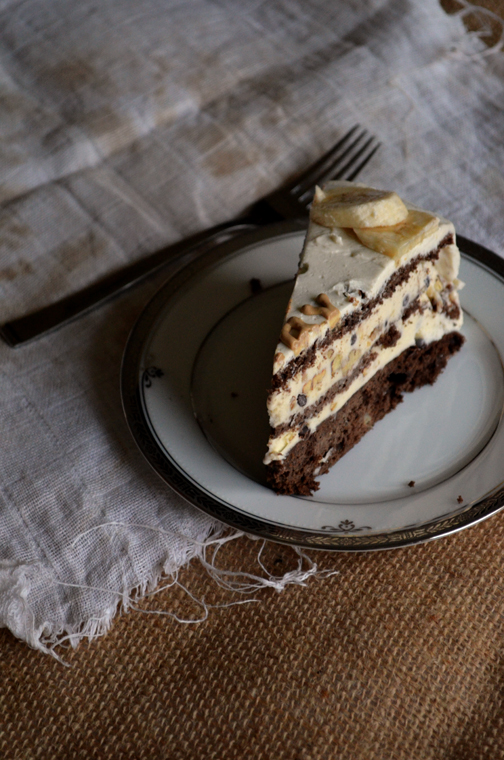
The next day, cut the cake into three even layers. Re-assemble the springform pan. Line the sides with plastic wrap or wax paper for easy removal of the cake so you don’t have to saw the edges of the cakes later on. 

Place the top layer (the domed one) of the cake on the bottom of the cake pan. (You’ll spread a thick layer of ice cream on top of it so that this way, the top of the cake won’t be domed. Alternately, if you really want to make your layers even, cut off the dome before layering your cake.)

You’ll need to work quickly for this next part. Add about 4 cups of vanilla ice cream, half of the mashed banana, and half of the chocolate chips and walnuts to a mixing bowl. Mash them together with a wooden spoon. It doesn’t have to be perfect, its more important that the ice cream doesn’t melt. Spread the ice cream over the layer of cake at the bottom of the springform pan. Place the pan in the freezer for about 30 minutes, so that the layer of ice cream is firm.

Place another cake layer on top of the ice cream. Repeat the the step above with the remaining ice cream, banana, nuts, and chocolate chips. Top with the final cake layer. Freeze the cake for at least 2 hours, or overnight.

Make the frosting. Whisk together the cream cheese, powdered sugar, and vanilla extract. 

Remove the cake from the springform pan. Spread the frosting over the cake, and decorate with banana slices. If the cake starts to melt while you’re frosting it, return it to the freezer for another 30 minutes.
Cut the cake with a sharp knife run under hot water, and serve!


In cake, ice cream Tags ice cream, banana, chocolate, cake, nuts
Lavender Sables | Pass the Cocoa

Lavender Sablé Cookies, Step by Step

Caroline Zhang December 17, 2014
Lavender Sables | Pass the Cocoa

These cookies are beautiful in their simplicity. They are humble and unpretentious, yet so delicious. Sablé comes from the French word for "sand," but I don't think that it really describes these cookies. They are soft, delicate, sweet without being overwhelmingly so. They are buttery and crumbly, almost melting in your mouth as you take a bite.

Recipes like this, for simple shortbread cookies, remind me how magical the baking really is, to transform a couple basic pantry ingredients into something delicious.

We haven't done step-by-step posts in a while, but I really wanted to capture the process of turning some flour, butter, and sugar into some amazing cookies. So here we go:

Grind together some sugar and lavender in a food processor or go the old-fashioned way with a mortar and pestle.

Lavender | Pass the Cocoa

Whisk that together with some room temperature butter, and then the vanilla. Since there's so few ingredients, you really need some high-quality butter. (I used Kerrygold). Don't even THINK about using margarine or shortening.

Sift together the flour and salt over the butter mixture.

Gently fold in the flour. Don't overwork the dough, or else your cookies will become tough.

Turn the dough out onto a piece of wax paper or plastic wrap. Divide it in two evenly. Pat the dough into a log, and roll it in the wax paper. Do the same for the other log. Refrigerate it for at least two hours, or overnight.

The next day, roll the logs in granulated sugar, slice into 1/4-inch thick pieces, place on a parchment-lined cookie sheet, and bake. Alternately, you could roll them out and make cutout cookies.

Lavender Sable Cookies | Pass the Cocoa

I dressed my cookies up with some chocolate decorations. To make them, place a stencil over the cookies, and carefully paint over it with a small paintbrush dipped in melted chocolate. In retrospect, this would have worked better if I had made cutout cookies, so that the surface was completely flat.

Lavender Sables | Pass the Cocoa

Enjoy!
Caroline

One year ago: Perfect Couple Chocolate Chip Cookies
Two years ago: Chelsea Buns


Lavender Sablé

Click here for the printer-friendly recipe.
Yields: 36-40 cookies
Adapted from the Pierre Herme Pastries cookbook

Ingredients
½ cup granulated sugar
2 tablespoons dried culinary lavender*
1 cup butter, at room temperature
2 teaspoons vanilla extract
½ teaspoon salt
2 ½ cups all-purpose flour

For Assembly
⅓ cup granulated sugar
2 ounces semi-sweet chocolate (optional


Notes
* If you don’t have a food processor, you can add the lavender without grinding it, though the flavor won’t be as developed. Alternatively, you could leave out the lavender altogether, and make some delicious vanilla sables. 

**You could also refrigerate the dough in a disk, then roll it out to make cut-out cookies.

Directions
In a food processor (or with a mortar and and pestle), grind together the sugar and dried lavender. You don’t have to grind it to a powder, just enough to break up the pieces of lavender.

Whisk together the butter and lavender-sugar until light and fluffy. Whisk in the vanilla. Set aside.

Sift together the flour and salt. Fold the dry ingredients into the butter mixture, until it just comes together. Do not overmix.
Turn the dough onto a piece of wax paper or plastic wrap. Shape the dough into two logs, about 2 inches wide, and wrap them in the paper. Roll the logs around slightly, to make them cylindrical.**

Refrigerate the dough for at least two hours, or overnight.

Preheat the oven to 350 F. Unwrap the dough. Sprinkle about ⅓ cup of granulated sugar on a cutting board a tabletop, and roll the dough log in granulated sugar.

Slice the dough into about ¼-inch thick disks. Place onto a parchment-lined (or greased) cookie sheet, and bake for about 10-12 minutes, or until the cookies turn golden brown around the edges. Let cool completely.

If desired, decorate with melted chocolate. Place a stencil over the cookies, and with a small brush, paint over it with melted chocolate


In cookie Tags cookies, shortbread, easy, step by step

Pumpkin Roll

Monica Cheng December 15, 2014

Whew! Feels great to be done with all those final papers and be back home for the winter (: With the amount of writing Caroline and I have done for our classes this semester/quarter, I bet we could just about publish a small novella! Some kind of fusion between the post-British Empire and bioethics/health activism...hmmm. That would be interesting

And of course, I must give my two cents on the topic of weather now that I'm back home. Here I am bundled up in my thickest furry coat, already acclimated to the 20-30 degree Chicago weather, and then I arrive home to a balmy 50 degrees. Seriously, the temperature difference between Chicago and Indiana never fails to astonish me. Winter coat? Who needs that? I'll just wear this T-shirt, thank you very much

So I might be a little crazy for still making pumpkin recipes in the middle of December, but when I came across these pumpkin rolls...GAH, I just couldn't help myself. I was in a very pumpkin mood all of a sudden. I hope you guys will forgive me...I dusted the rolls with powdered sugar so that it looked snowy and pretty (:

I've always wanted to try making a cake roll, so I was pretty excited to make these pumpkin rolls. It seemed really intimidating at first because there are always the warnings of a cracked cake or something that doesn't work out in the cake-rolling steps. But luckily I had no trouble at all working with the cake, and I think it turned out all right, don't you think?

It's actually a lot easier than I expected; I don't really have any special advice other than to make sure the baking sheet is well-greased so that it is easy to transfer the cake to the parchment paper for rolling.

Seriously, these are de-li-cious and make for a stunning presentation (especially if you make in the autumn months). The pumpkin cake is super moist and flavorful, and the cream cheese filling is on point. I bet it would be even more tasty with cinnamon cream cheese. Mmm...

I'm definitely making these cake rolls again, maybe experimenting with different flavors and filling combos. Hope you guys give these pumpkin rolls a try, if not this year then next fall!

Cheers,
Monica

Two months ago: Pumpkin Nanaimo Bars
One month ago: Flourless Mini Chocolate Cake Bites
One year ago: Christmas Morning Cinnamon Rolls


PUMPKIN ROLL

From Brown Eyed Baker | Yield: 8 - 10 servings | Time: 2 hours

Ingredients
For the cake:
3/4 cup all-purpose flour
1/2 teaspoon baking powder
1/2 teaspoon baking soda
1/2 teaspoon ground cinnamon
1/2 teaspoon cloves
1/4 teaspoon salt
1 cup granulated sugar
3 eggs
2/3 cup pure pumpkin puree (i.e. Libby's)

For the filling:
8 ounces cream cheese, room temp
6 tablespoons unsalted butter, room temp
1 cup powdered sugar
1 teaspoon pure vanilla extract

Powdered sugar, for sprinkling

Directions
For the cake:
Preheat oven to 375 degrees F. Grease 15 x 10 inch jelly roll pan. Line with parchment paper.

In a small bowl, whisk together the flour, baking powder, baking soda, cinnamon, cloves, and salt.

In a separate bowl, thoroughly beat sugar and eggs (2 minutes). Add pumpkin, then fold in dry ingredients. Do not over-mix. Pour into pan and smooth into an even layer. Bake for 13 - 15 minutes, until top of cake springs back when lightly pressed. Run a knife around the sides of the pan to loosen the cake.

Prepare a piece of parchment paper on the counter and sprinkle with 1/4 cup powdered sugar. Turn the cake out onto the prepared piece of parchment paper and carefully peel off the parchment paper from the top of the cake. Starting with short end, carefully roll up the cake with the parchment paper. Place rolled cake on wire rack, seam-side down, and allow to cool to room temperature.

For the filling:
Beat cream cheese and butter until smooth. Add powdered sugar, then vanilla.

Carefully unroll the cake. Spread cream cheese filling evenly over the surface of the cake. Re-roll cake. Wrap tightly in plastic wrap and refrigerate for 1 hour. When ready to serve, dust with powdered sugar. Enjoy!

Storage Note: Wrap tightly in plastic wrap or place in air-tight container and refrigerate.


Tags fall, thanksgiving, holiday
Celtic Knot Cookies | Pass the Cocoa

Celtic Knot Spice Cookies

Caroline Zhang December 13, 2014
Celtic Knot Cookies | Pass the Cocoa

I always get a little envious when I read other food blogs this time of year. As other bloggers make Christmas cookies and holiday recipes, Monica and I are both slogging through the final days of papers and exams. I have one more final paper left, which I'm supposed to be writing instead of posting this, and progress is extremely slow right now...there's a jar of molasses sitting in a bin somewhere behind me, just begging to be baked into something warm and sweet and spicy. 

Holiday-themed food blog posts have become one of my biggest sources of procrastination right now, and telling myself that the sooner I finish this paper, the sooner I can actually bake something doesn't seem to help. At this point, anything seems more interesting than final essays. Even 1990s British rom coms. (Thank you Bridget Jones' Diary and Hugh Grant, by the way, for reminding me that I still like Britain, even after three final papers and an exam about it in the past two weeks).

Celtic Knot Cookies | Pass the Cocoa

I won't bore you with the details of my abnormal sleep and meal schedule, or that time I stayed up until 3 am listening to ballads about Irish revolutionaries, but suffice to say Ireland seems to always enter my conversations, and even onto this here blog.

I made these cookies in a I-don't-give-a-damn-about-finals-right-now-I-just-finished-an-exam-and-really-need-a-cookie sort of mood last week, but somehow they ended up being inspired by Ireland anyways. (By the by, I just tallied up the number of pages I've written about Ireland this semester, and am pushing 70...sometimes I wonder about what I do with my time here.) I came across these beautifully shaped cookies a few years ago, and when I was considering what to do with all the post-British Empire exam spice cookie dough I made, I thought of them.

It takes a couple of attempts to get the hang of making these cookies.  (You can find step-by-step pictures here.) I found that the easiest thing to do was to shape the dough on a tabletop, transfer them to a small piece of foil, freeze them until they're completely hard, and then peel them off and bake them on a cookie sheet. You work with the dough a lot as you shape them, so you'll want to make sure they're thoroughly chilled before baking.

Celtic Knot Spice Cookies | Pass the Cocoa

Give these guys a try. Their unique shape would make them a great addition to any cookie platter. They're a bit time-consuming, but fun to make, as well as delicious, crumbly, buttery, and sweet, with a healthy dose of spices. Perfect to munch on as you're "writing a paper."

Here's to the home stretch.

-Caroline


Celtic Knot Spice Cookies

Click here for the printer-friendly recipe
Yields: about 18 cookies
Adapted from Martha Stewart and Sprinkle Bakes

Ingredients
1 cup butter, at room temperature
⅔ cup dark brown sugar
1 egg, room temperature
1 teaspoon vanilla extract
2 ¾ cups flour
½ teaspoon salt
2 teaspoons cinnamon
2 teaspoons ground ginger
½ teaspoon nutmeg
½ teaspoon allspice
¼ teaspoon ground black pepper
½ cup granulated sugar

Directions
Whisk together the butter and brown sugar until fluffy. Whisk in the egg and vanilla. Set aside.

Sift together the flour, salt, and spices. Mix flour mixture into the butter mixture, until just combined. Do not overmix or the cookies will become tough. Chill the dough for at least one hour, or overnight.

Cut out several squares of 4x4 inch squares of foil or wax paper. 

Roll about 2-3 tablespoons of dough into a 12-inch rope. Arrange the dough so that it curves downward, like a rainbow. Bring up one end of the dough over the middle, forming a loop. Bring up the other end of the dough over the middle as well, forming a second loop. pinch together the two ends of the rope, so that they form a third loop.

Roll another 1 ½ - 2 tablespoons of dough into an 8-inch rope. Lay the rope in a circle over the shape you just formed. Pinch together the two ends, pinching off extra dough if the circle is too large. 

Carefully transfer the cookie onto the foil. Place the cookie in the freezer for at least 30 minutes.

Repeat this process of shaping the cookies with the rest of the dough.
Preheat the oven to 350 F. Grease a large cookie sheet. 

Pour the granulated sugar in a shallow bowl. Carefully peel the frozen cookies off the foil, and dip face-down in the sugar. Place onto the cookie sheet.

Bake the cookies for about 18-20 minutes. (You might need to bake slightly more or less, depending on the size of your cookies). Let cool and enjoy!


← NewerOlder →

Search Posts

Post Archive
  • "easy"
  • "breakfast"
  • "chocolate"
  • "cookie"
  • cake
  • cookie
  • "fruit"
  • "summer"
  • "bread"
  • "Cheesecake"
  • "Oreo"
  • "dessert"
  • "fancy"
  • "Cake"
  • "blueberry"
  • pie
  • "cinnamon"
  • savory
  • breakfast
  • "berry"
  • "brownie"
  • "cupcake"
  • "holiday"
  • "nutella"
  • bars and brownies
  • "apple"
  • "birthday"
  • "pastry"
  • "pie"
  • "scone"
  • bread
  • candy
  • cheesecake
  • "banana"
  • "biscuit"
  • "citrus"
  • "ganache"
  • "lemon"
  • "macaron"
  • "muffin"
  • "strawberry"
  • "vegetable"
  • "almond"
  • "buttercream"
  • "cake mix"
  • "cranberry"
  • "cream cheese"
  • "frosting"
  • "glaze"
  • "healthy"
 

Powered by Squarespace